Order Picking and Put-Away
-
Order Picking and Put-Away
- Selecting Orders to Pick and Store
- Confirm Picking and Put-Away
- Floating batch picking with flow racks and vertical lifts
- Pick Front for AGVs
- Pick Front for 2 Step Picking
- Batch pick from order forms
- The Pick Window
- Selection Orders to Pick or Store
- Handling Deviations
- Express Orders
- Quick Store of Articles
- Printing Order Labels
- Picking in Automats to Boxes
- Process: Order based picking in Automats
- Configuration
The Logisoft PC client is used for order picking from automats, high runner flow racks and pick fronts.
The typical way of using batch-picking is by choosing a number of orders and then finish picking them before starting the next batch. Logisoft has a variant for automated warehousing called floating batch picking, where orders can constantly be added and removed from the batch when picking has been completed. With this technique, you have the advantage of always working with a batch of optimum size, thus avoiding that the last part of the batch with only a few lines left unfolds less optimally.
Picks and put-away can be mixed or kept separate depending on the preferences of the user.
This function is often used together with automats, but it can also be taken to use in other situations where one or more screens in fixed locations can be used in connection with picks in a zone.
There are a number of configuration options, all of which are described under the configuration section.
Logisoft supports different strategies for which orders are entered into a batch. Which method is best will depend on how the warehouse is organized as well as how the processes are in general:
-
The operator will choose which orders are to be picked, either directly from a list or by scanning a bar code with the order number.
-
Logisoft chooses which orders ought to be picked in a vertical lift zone. You typically pick to boxes having a bar code.
-
Logisoft chooses which orders should be picked, and articles are picked into a pick cart.
Selecting Orders to Pick and Store
Orders can be selected in different ways:
- Manually by selecting the order number from a list or by entering the number.
- Pick/store orders assigned to a pick cart by choosing the cart.
- Activated when a tote arrives from a conveyor.
Manually Order Selection
The order selection window is used to manually choose which orders that are going to be picked or stored.
To start an order it must first be released for picking or goods received to be stored. If a outbound picking order is selected, that is not yet released, it will happen automatically.
When an order is selected and it is automatically released, it will not necessarily be released for the current zone where the order is selected. Depending on the selected visibility of orders, it might disappear because it is released for another zone.
Read more about releasing of outbound orders here
To select one or more orders
The order selection screen is opened. The screen is mainly made up of two lists; the one on top is a list of all open orders within the system. The one on the bottom lists the Order lines chosen, in order to provide a neat overview of what is activated.

The field Order Number: In the top left corner you find a field into which an order number can be typed. In case there are many orders this is the easiest way to find a desired order. Typically, however, this is used in connection with a barcode scanner for fast look-up of a desired order.

Selection of Order Type: Here you are to choose whether you wish to view picking or storage orders. It is possible to choose both storage and picking within the same batch.

Changing of Order Status: It is possible to mark an order with either ”OK” or ”Rejected” when it has not been run through. This is done by right clicking with the mouse on the given order and choosing the desired status. This is used when you - for any reason - do not wish to run an order through. If Logisoft is coupled with a hosting system, a note will be returned specifying the status and the actual number of stocked/picked items.

Sorting of Columns: It is possible to determine the order of the orders. This is done by clicking on the desired sorting column. Click twice for reverse sorting.
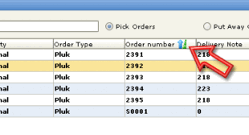
Order List:
[Choose]: Click here to activate the order.
Priority: The priority of the order.
Order Type: Logisoft can operate with many order types, for instance sales orders, production orders, return items, etc.
Order Number: The order number.
Delivery Note: Delivery note number.
Order Date: The date of order. This will mostly be the date of delivery but can also be the date on which Logisoft received the order.
Client: The client’s name.
Lines: Displays the quantity of lines / remaining lines.
Order Status: The status of a given order.
Remainder Status: Shows whether there are remaining items or whether there has been a remainder situation connected to the order.
Box: If the order is connected to a box, the boxnumber will appear here.
Order Zones: Shows the zones in which the given order is to be picked. If no zones are stated and the order is open, the order has probably yet to be released.
To close the Order Selection Window without pressing the key, make a barcode that contains “OK”. Scanning this barcode will close the window automatically. This can be combined with the “AutoOpenOrderSelection” attribute, to work only with the barcode scanner.
Confirm Picking and Put-Away
Each transaction must somehow be confirmed; this can be as simple as pressing the enter key or the “Accept” button on the screen or by confirming a number of values.
The confirmation strategy is a global setup for all PCs.
Open: Maintenance -> Order Settings -> Pick and Put-Away Confirmation.
Here is it defined what should be confirmed when picking or doing put-away. Select “Accept anything” to confim by pressing enter or pressing the key on the touch monitor.
The client must be restarted to activate the changes.
It is possible to make a special barcode that works as a “accept anything code”.

Figure 1 - Configuration of confirmation strategy.
Some special features can be set using the System Configuration panel.
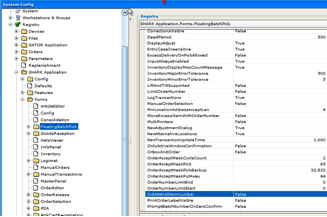
| Parameter | Value | Description |
|---|---|---|
| OrEANAndItemNumber | true/false | A flag is available for confirmation of either article or EAN number |
| ConfirmAllBoxNumbersMask | String | This is a (bar)code that can be used to confirm any box number. Default is *9999*. |
| ConfirmAllLocationAddressMask | String | Code that can be used to confirm any box number. Default is *7777*. |
| ConfirmAllItemNumbersMask | String | Code that can be used to confirm any box number. Default is *8888*. |
Using Pick Carts
Picks are always made to boxes, where the box has a unique barcode identifying the box. The box and the barcode may either be reused again and again, or a specific label can be printed for each pick. The former is used when picking to standard boxes, which will be repacked later, while - if picking to boxes sent directly to the customer - a label will be printed and attached to the box.
What then, is the advantage of using a picking cart? The cart is best utilized when picking in several zones. Here a pick cart can be started up with a number of orders in one zone and then driving the cart through all the zones while picking what needs to be picked in each single area. Once the cart has been registered, then afterwards you only have to cancel/record the cart in each single zone in order to start picking to all the boxes on the cart, meaning that you do not have to start every order separately. Recording and cancelling a cart is done by simply scanning the cart’s bar code.
A pick cart consists of the following:
- The pick cart has a pick cart number, which is normally a bar code.
- The pick cart has a number of positions, where each position has a number. The position number is composed of the pick cart number and the actual position. Thus, if pick cart 4 has position 3 (3 space) it will be called 04-03.
- At each position there is room for a pick box, this box will also have a box number.
Pick carts can be more or less “smart”, some having marker lights and acknowledgement buttons with wireless technology, thereby giving Logisoft direct control over the cart, others are more simple, using only bar codes.
Almost all operations in the following, are done from LogisoftS batch pick screen, if picking is done from vertical lifts, but picking can also be done from PDA’s or with paper pick lists.
Before start
Where wireless pick carts are being used, you should make sure the cart is ready for use. Which means that the batteries are fully charged and that it is on the “the network”. If the cart has just been turned on (removed from charging) and has not yet been used, Logisoft will blink the first lamp on the cart to indicate that the cart was found. Push the button to turn it off or leave it, until it turns off by itself when you finish using the cart.

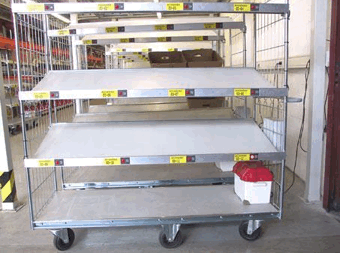
The first lamp on the pick cart will blink when Logisoft has “found” the cart.
Starting up and registering a pick cart
When a pick cart arrives it must be registered in the zone. This is done by scanning its bar code.
Canceling a pick cart from a zone
If you want a pick cart to be cancelled from a zone, it may be cancelled before it is finished. This is easily done by again shooting the cart’s bar code.
Picking
It is quite simple to pick articles into the cart. The screen picture gives clear guidelines.
Batch picking using pick carts and PDA
The following describes how work is done using pick carts and PDA’s in rack or pallet warehouses. When picking using this method, Logisoft selects the next order for picking.
Picking is always done into a box with a bar code with a unique bar code label to identify the box. If the box is a reusable container, the label is also reused. Alternatively, a new label can be printed every time on a label printer when picking into boxes, which are transported directly to the customer (pick-and-pack).
Recording the order on the pick cart
Before starting, orders must be recorded to the pick cart. This is not possible with the PDA, but must be done on a PC with a bar code scanner and with Logisoft installed.
The pick cart registration is done with the function below.
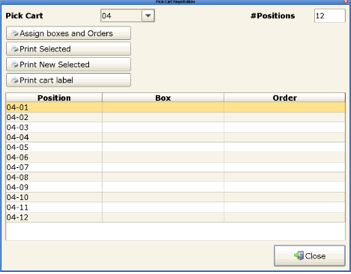
Screen picture for registration of pick carts.
Batch pick
The actual pick is done through the PDA terminal, which continually shows what needs to be done.
Unregistering of a pick cart
If for some reason, a pick cart needs to leave the zone before all picks are completed, it must be unregistered. This is done the same way as the recording, on a PC by again reading the bar code on the cart.
Floating batch picking with flow racks and vertical lifts
This section describes how batch-picks are performed with flowracks and vertical lifts.
What is in the following called a flowrack, can also simply be a table or another place which can be marked with a bar code.
Picks are always made into pick boxes having a unique bar code.
Every track on the flowrack has a unique position number, which is a special bar code. Alternatively, there may be light and an acknowledgement button installed, thereby avoiding having to acknowledge with the bar code scanner.
All ensuing operations take place from Logisoft’s batch pick screen. Refer to Error: Reference source not found for further information on its practical use.
When working in this way, Logisoft chooses the next order for picking. Thus the prioritizing and releasing of orders are important, since they are the mechanisms controlling, which order is the next to be picked. Only released orders can be picked!
Generally the following applies:
- You can have one order in each case.
- If the order cannot be in one box, you may continue with a new one as long as this is necessary.
- You may, if necessary, cancel one box before it has been completed.
Working procedure
The following procedure is applied:
- Logisoft’s batch picking screen must be open.
- When you want to start a new order, take an empty box and place it on a track in the flowrack.
- The bar code on the flowrack (the position) is scanned. Logisoft shows a registration screen in reply.
- The bar code on the box is then scanned.
- Logisoft now assigns the order to the box and the pick is started.
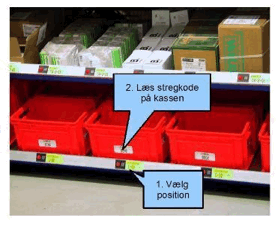
A typical flowrack, here with marker lights and acknowledgement buttons. However, you may always use the mounted bar codes in case of problems with the hardware.*
Pick Front for AGVs
The goods are brought to the picking front by an AGV (Automatic operated truck).
Pick Front for 2 Step Picking
A Pick Front used to pick from pallets that are not easy accessible and requires a truck. This is handled so a truck operator first moves the pallet down to the picking front, from where the (small) items can be picked directly to boxes or pick carts.
Batch pick from order forms
This is the most simple batch-picking method. It is the operator who chooses the next order to be picked, and no pick boxes, carts etc. are used.
Before picking articles, the order must be released. Refer to “Order Release” for more information on this. The system may be configured for automatic release when the order is imported, or when the order is picked on the Order Selection screen (see section Error: Reference source not found).
When picking in batches, the articles must be distributed to the right orders. As the order of the picked lines is not in order sequence, it may take time to find the right order. You can therefore use position labels, for which a number of fixed positions are set up, where a special bar code label is placed with a position code. The code can be very short and easy to find, for example A01, A02, A03, etc. When an order is activated, it is linked to the position code, and the screen will show the position so that the order is easy to find, so that the picked items can be placed with the order. Logisoft has integrated functions for printing position labels. It is most optimal having a bar code with an order number available for this function to be used. Otherwise the order number must be entered manually.
Work procedure - simple
- The batch pick screen in Logisoft is open.
- Open the order selection screen (you may use F3). You do not have to close the batch pick screen first.
- Select the order, either from the shown list of open orders or by entering or shooting a bar code with order number.
- The order is initiated and ready for picking.
Procedure - With position codes
- The batch pick screen in Logisoft is open.
- The operator scans a position code and Logisoft opens an order registration screen.
- The bar code on the address sheet is read.
- The order is initiated and ready for picking.
The Pick Window
Navigation
Keyboard: F8
Menu: Transactions -> Batch Picks.
Touch Screen: Large button on the login screen.
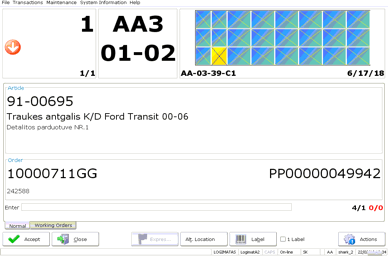
The batch-picking screen is designed so that it can be viewed from a long distance and can be controlled by a touch screen.

What is to be picked (on top):

Green arrow out / red arrow in: A green arrow-out marks that a pick is to be carried out (items going out of the stock). A red arrow-in, marks a put-away, meaning items are going into the stock.
Quantity: The quantity that is to be picked or stored is shown as the big numbers. This will often be identical to the number on the order line but in cases of picks/puttings spread over multiple locations the number can be smaller.
The Quantity is shown in red if the quantity before the transaction is
- This means if you are picking and the number is red, the location should be empty after the pick! Opposite, for store operation the location must be empty before anything is stored.
Unit: If a unit or package type is present, it will be displayed below the quantity.
Sub-lot: In the lower right corner is shown, if the line is split into 2 or more lots, this shows the total number of the orderline.
Pick from / to :

Location: Here you find information about from and whereto the pick will take place. Typically, it will be module name (name of automat) that is displayed. If the pick is made for pick boxes or likewise, the position to which the pick is made will also be displayed here. The figure above shows that the pick is from module (automat) AA3 and it goes to position 01-02, which could be trolley 01, position 02.
Tray Location:

Tray overview: Here you can see where in the tray/on the shelf the pick is to take place. All locations are displayed and the one from where the pick takes place or the one to where the put-away is going is highlighted in yellow.
Full location: By the tray overview you also find the complete location address for the marked location.
Quantities: By the tray overview there is information about the quantity prior to pick or putting. Three numbers are shown: On location/available total/total quantity.
On-location is what physical should be on the location before the pick. Available total is the total quantity in the system, that is available, this is the total stock minus stock reserved for already released orders. Total Quantity is the total physical stock, including the current and other locations.
Information about pick or putting in progress

Article: Here you find the article number and a description of the article.
Order: Order number, possibly including further information under the number.
Enter field

Enter: Text field into which the receipt information is written or
scanned. If receipt is to made with order number, location, article
number etc., the information in question is to be typed or scanned into
this field. In case a scanner is used and the code cannot be scanned,
the information can always be typed into this field.
Adjusting: Here one can enter an adjusted quantity that is wished
picked and put away when one cannot comply with what is suggested by the
system.
Batch Information

Batch size: Here is displayed the current size of the running batch of order lines. 2 numbers are displayed: processed lines/lines left. The figure shows that this is the line 4 and there is 1 left. Optional some statistic number can be displayed in (in red), this is pick statistics for the last hour.
Tab: Working orders:
On this screen one can see which orders are active. It is also possible to delete an active order by unchecking the order and pressing [Apply].
Note: One can define a code that is to be scanned or typed instead of scanning EAN, location, boxnumber and item number in instances where the code cannot be read.
Selection Orders to Pick or Store
Simple Order Selection
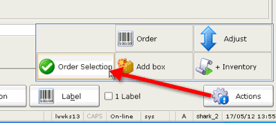
If one wishes to execute a particular order, it is also possible to choose an order manually.
Press [Actions] -> [Order Selection] or F3 to open the Order Selection Screen.
Choose whether you wish for the search to be performed by pick orders or put-away orders. Choose the order either by ticking off the select field next to the order, by writing the order number in the typing field, or by scanning a barcode with the order number.

Tips:
One can click on an order and view the affiliated orderlines. It does not mean that it is selected, as it is only an opportunity to view the content of an order before it is selected.
Click in the column names in the order list to have the list sorted by that particular column. Click once again to reverse the sorting.
If a touch screen is used it can be advantageous to increase the line distance of the order screen. This can be done under System Configuration.
Execution of User-determined Orders (With Position Codes)
- The batch picking screen is open.
- The operator scans a position code and Logisoft opens an order registration screen.
- The barcode on the order note is scanned.
- bThe order is initiated and the picking can continue as usual.
Batch Picking with Boxes
The standard procedure is for Logisoft to determine which orders are next in line for execution.
- Scan a position label (barcode of a run-through shelf, a pick cart, or another location)

-
Logisoft opens an Order registration window.
-
Scan a boxnumber, either on a put-away box on which items have already been registered (via the item receipt) or on an empty box that can be used for picking of an order. Logisoft chooses and activates the order and includes it in the group of orders (batch) that are active. If an order is complete the following window will appear:

-
Scan the box once more (to confirm that the handling of box has been completed) and remove the box.Repeat the procedure for a new box (go to step 1)
Batch Picks with Positions and Orders
This procedure assign each order to a position, no boxes or pick cards are used. The idea is that when multiple orders are picked in parallel, the operator does not have to search for the order number, but can use the position number instead.
1. Scan a position label (barcode of a run-through shelf, a pick cart, or another location)

Logisoft opens an Order registration window.
- Scan an ordernumber to start the order.
Deselect an Active Order
One can deselect an order that is in progress. This will immediately disrupt the picking and the order will be in a “partly picked” status and can then be completely picked later on.
Pick the Order in Multiple Boxes
If picking is carried out for a box and the box is full it can be necessary to ”switch” box. This is done as follows:
- Remove the fully loaded box.
- Scan the position.
- Scan a new, empty box.
The picking will now be carried out for the new box.
Undo Picking For a Box
If one wishes to remove a box with a given order from an active batch, this is done as follows:
- Scan the position of the box.
- Scan the barcode of the box.
Thus, the same procedure as for choosing a new order for an empty box.
Handling Deviations
If all data is correct and the work flow is as planned, there is no reason to deviate from what Logisoft tells, but in praxis it can be required to make changes to the picked or stored quantity or the suggested location. There are a numbers of ways to handle situation, where the requested operation cannot be fulfilled.
Adjusting the Picked Quantity (simple)
The simple quantity adjustment allows for the picked or stored quantity to be adjusted, simply by entering the value in a field. It requires the configuration parameter CorrectionsVisible=True and CorrectionEnabled=true.
- Enter the corrected quantity.
- Confirm the normal way in the “Enter” field.
The corrected quantity must be less what is available on the location.

Adjusting the Picked Quantity (advanced)
There can be various reasons why it is not possible or desirable to pick the requested quantity. For example:
- There is a stock error, so it is not possible to pick enough from the location.
- The quantity must be adjusted to what is possible or practical to pick.
- Late changes to the order.
The following requires that the configuration parameter NewAdjustmentDialog=True (False is used for backward compability).
Press [Actions] -> [Adjust]
This will pop up:
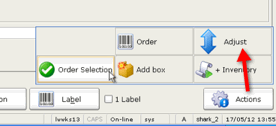
To change the quantity picked enter the quantity in the “Adjust” field and press [Accept]. This will enable the tabs:
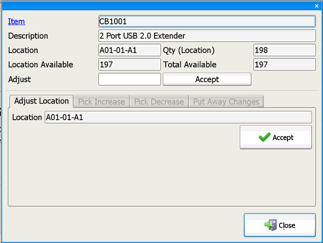
Select now either to adjust the location quantity or to adjust the quantity to pick.
It is also possible to specify a reason for the correction.
Changing of Suggested Put-away Location
To select an alternative location for storing goods:
1. Select the Alternative Location dialog.

2. Select the location.
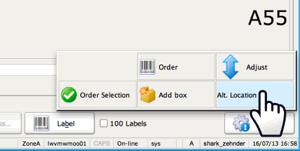
Changing of Put-away Quantity - insufficient space at location
In case the location does not have the space necessary for the quantity suggested by Logisoft , do the following:
- In the ”Adjusted” field, type the actual quantity put-away.
- Make receipt as usual.
- A menu is shown saying “New Location Wanted?” Answer “Yes”.
- A menu is shown allowing for selection of a new location. Select location.
- A new put-away of the remaining items is being executed. The entire procedure can be repeated if space is still insufficient.
Note: It is not given that the put-away of the remaining items will be executed immediately after. If another orderline is faster to put away, then that one will be chosen first!
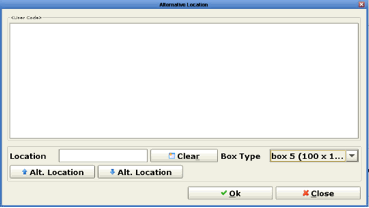
Dialogue screen for selection of alternative put-away location:
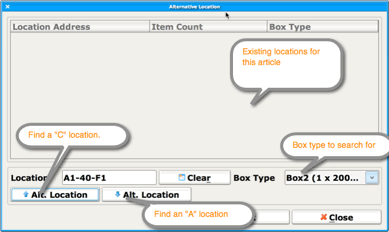
The list shows the existing locations. If desired, select one of these (click the line) and press OK to close the dialogue.
- If a new location is wished for, choose box type.
- If a new location is wished for in a specific area (e.g. tray or automat), write part of the address (e.g. A1-5 for a location in automat A1, tray 5). It is also possible to write the full address.
- Choose ”Alternative location” using the cursor keys up or down. This will either return a location for frequently picked items or location for low frequency items.
- Press “OK” when the location is selected.
Changing of Put-away Quantity - Not Enough Items
If there are not enough items for the order line, do as follows:
- In the “Adjusted” field, write the actual quantity put away
- Make receipt as usual.
- A menu is shown saying “New Location Wanted?” Answer “No”.
- The order is closed but with the adjusted quantity as put-away. The actual put-away quantity will be reported back to any host system connected.
Changing of Put-away Quantity (Simple)
One can change the put-away quantity by typing the actual quantity in the adjusted field. The quantity entered will then be applied and the order will have a partly picked status.
It is possible to reactive the order (release) in order to pick the remaining quantity.
Changing of Put-away Quantity (Not Enough at Location)
In case it is impossible to pick the desired quantity, one can go through the following procedure:
- Press [Adjust]
- Choose the reason for adjustment (here ”Adjust Location”).
- Type the actual quantity on the location.
- Press [OK]
- Press [Close]
The quantity on the location will be adjusted and the pick will be adjusted to what is actually available. The location will afterwards be empty.
The order must be reactivated to pick the remaining quantity.
Changing of Put-away Quantity (Adjust Put-away Amount)
If one wishes to change the put-away quantity, e.g. if the client in the
very last moment changes the order or if the packaging sizes are making
the ordered amount inexpedient, the quantity of the order can be
changed.
Upwards adjustment to an order line is only possible when the system is
configured to perform this (set AllowOverCorrectionPutAway=true).
- Press [Adjust].
- Choose the reason for the adjustment (here, decrease/increase order).
- Type the desired quantity of the order.
- Press [OK]
- Press [Close]
The quantity on the location will be adjusted and the pick will be adjusted accordingly.
In case the put-away quantity exceeds what is on the location the order must be reactivated in order to initiate pick from another location if possible.
Express Orders
If Express Orders have been defined in the system, the button Express Orders will appear when one or more of such orders exist(s). One can then directly press the button in order to disrupt orders in progress and activate the urgent order(s) that is/are awaiting. Afterwards, the process regarding the previous orders can then be reinitiated.
Quick Store of Articles
A special function can be enabled from the configuration menu that allows easy matching of article numbers with inbound orders without using a goods reception.
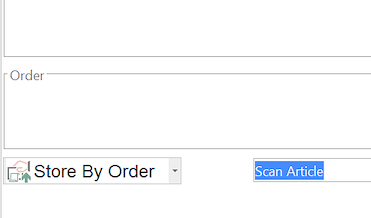 Optional select button for quick goods reception and store
Printing Order Labels
To print order labels from the Floating Batch window, the following must be configured:
A label printer must be defined.
A template must be defined to format the label.
The Label Template usage is “Pick Cart Ordre Registration”. This setup must be done.
Set the configuration parameter :
“Logisoft Application > Forms > Order Selection > AutoAssignBox” to
true
(The system requires to order to have a transport box or pallet.
Set the configuration parameter:
“Logisoft Application > Forms > Order Selection > AutoPrintOrder” to
true to automatically print an order when it is activated. Set to false
if this should be manually.
Picking in Automats to Boxes
In this setup, picking is done to boxes (handling units) that are placed on positions.
The reason to register each box/order on a position, is that the operator then don’t have to search for the box or order number, when multiple orders are picked in parallel. Instead the screen shows the position, which is a simple index number that is easy and fast to find.

Example on how position and boxes works: Box 123 is scanned to position 1, box 343 is scanned to position 2, box 276 is scanned to position 3.
Step 1
The batch pick/store window is opened.
Step 2
To register an order, scan a position barcode. The box registration dialog will be shown with 2 input fields:
 </p></td>
Step 3
Scan first the position barcode.
Step 4
Scan the box number. This will automatically activate the next order in the order queue and assign the scanned box to this order.
Step 5
The order(s) is started</strong> and the window get the tray and shows the next operation.
Step 6
The operator picks the items</strong> and may confirm by scanning one or more IDs in the automat: article number, location address.

The quantity indicated in the upper left field.
Step 7
The window shows the position of the box/order where the items must be placed.

Confirm for example by scan the box number or order number.
Step 8
Goto step 3 until all items are stored.
Notes:
- The operator may stop and start orders when needed. It improves the speed to have as orders in work at the same time, this makes it easier for the system to optimize speed.
- Pick and put-away can run in parallel.
- The operations are done in the fastest way, all machines will operate in parallel and the operations will be sorted to minimimize delays.
Variations:
- Use Pick-by-light hardware in the Automats.
- Use Pick-by-light hardware for the positions, with a lamp and a push button. Thereby it can avoided to confirm by the scanner.
- Instead of a box, an order number can be scanned. This can for example be a picking list with the order number as a barcode.
- The positions can be placed on a table, shelving or a transportable pick cart.
Process: Order based picking in Automats
Step 1
The batch pick/away window is open
Step 2
Open the Order Selection window to select 1 or more orders to store. Activate from a list, enter the order numbers or scan the order number from a barcode.</p></td>
Step 3
The order(s) is started and the window get the tray and shows the next operation.
Step 4
The operator picks the item and confirm by scanning one or more IDs: article number, order number, batch number, box number, location address.
Step 5
Goto step 3 until all items are stored.
Notes:
- The operator may stop and start orders when needed. It improves the speed to have as orders in work at the same time, this makes it easier for the system to optimize speed.
- Pick and put-away can run in parallel.
- The operations are done in the fastest way, all machines will operate in parallel and the operations will be sorted to minimimize delays.
Configuration
There are many possible ways of customizing the order pick window.
Choose Order Selection Strategy
Registry > Logisoft Application > Forms > OrderSelection
| Parameter | Value | Description | |
|---|---|---|---|
| InstantRelease | true/false | Orders are released automatically when they are chosed. Usefull in smaller installations where order release management is not really needed. | |
| AutoAssignBox | true/false | ||
| DisplayInventoryOrders | true/false | ||
| OrderRefreshInterval | Number | Time in ms between update of orders from the server. | |
| OrderTimeout | Number | Time in seconds until finished orders will disappear. | |
| RowHeight | Number | Height (Line spacing) of the displayed rows. Default is 18. | |
| RunImmediately | true/false | The order will start immediately, when it is selected. This is the default behavior. |
| Who Choose Order | Use Pick Cart/Positions Method_Configuration | |
|---|---|---|
| Operator. | No. | Open the Order Selection Window and scan the order number |
| Operator. | Positions (Scan a position barcode. | A dialog will show that ask for order number and a box number |
| Operator. | Pick cart. | Prepare first the pick cart. |
| Automatically (1) | No | Not possible</td> |
| Automatically. | Positions. | Scan a position barcode. A dialog will be shown that ask for a box number. |
| Automatically. | Pick Cart. | Prepare first the pick cart. |
Notes:
(1) Automatically means Logisoft choose the next order to pick. The order is given by order priority and the delivery date, other criteria’s can be used as well, but this might requires some rules to be defined. The order must be released to be selected automatically.
(2) A position is a special barcode with a position name. It is used as a fast way to find the order and for confirmation, when multiple orders are picked in parallel.
General Configuration
The Batch Picking panel can be customized with a number of parameters.
Open the configuration dialog from here:
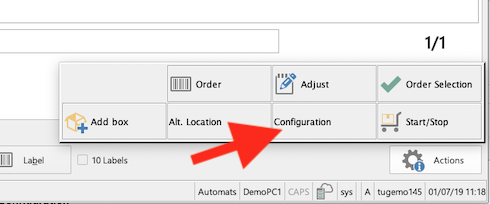
or from the main configuration:
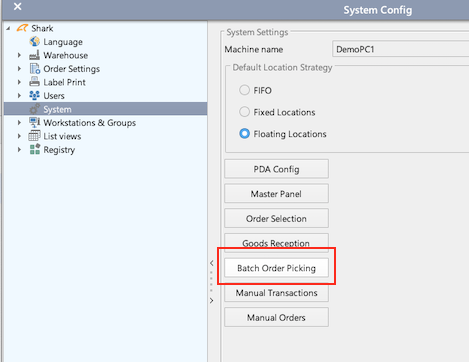
The configuration dialog has a number of sections.
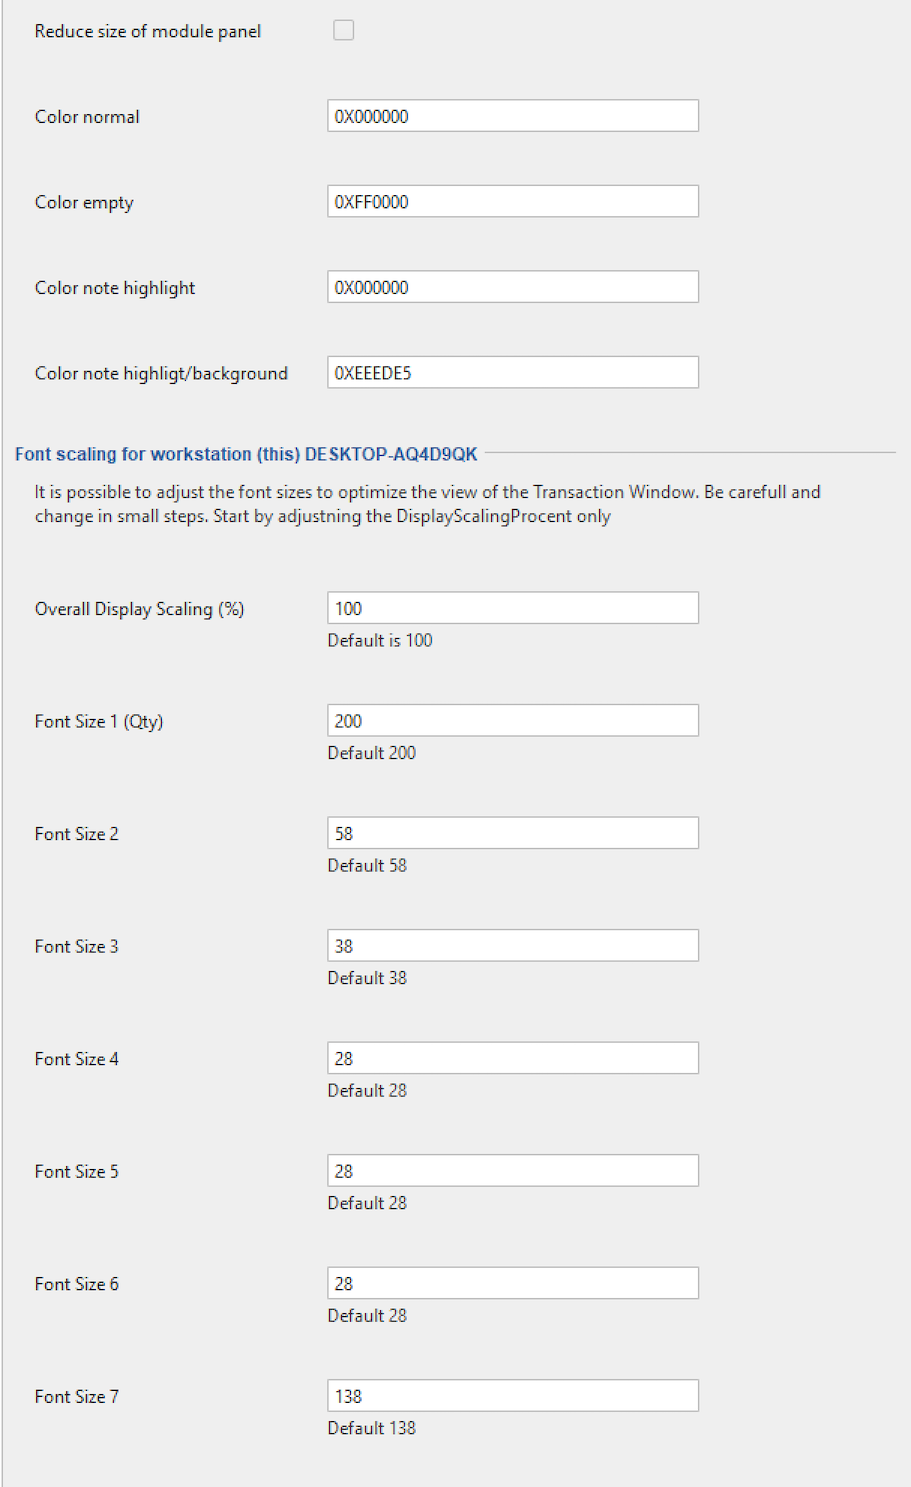
Display Layout
Select which fields should be visible. There is no need to show fields that are empty. It is also possible to change some of the used colors.
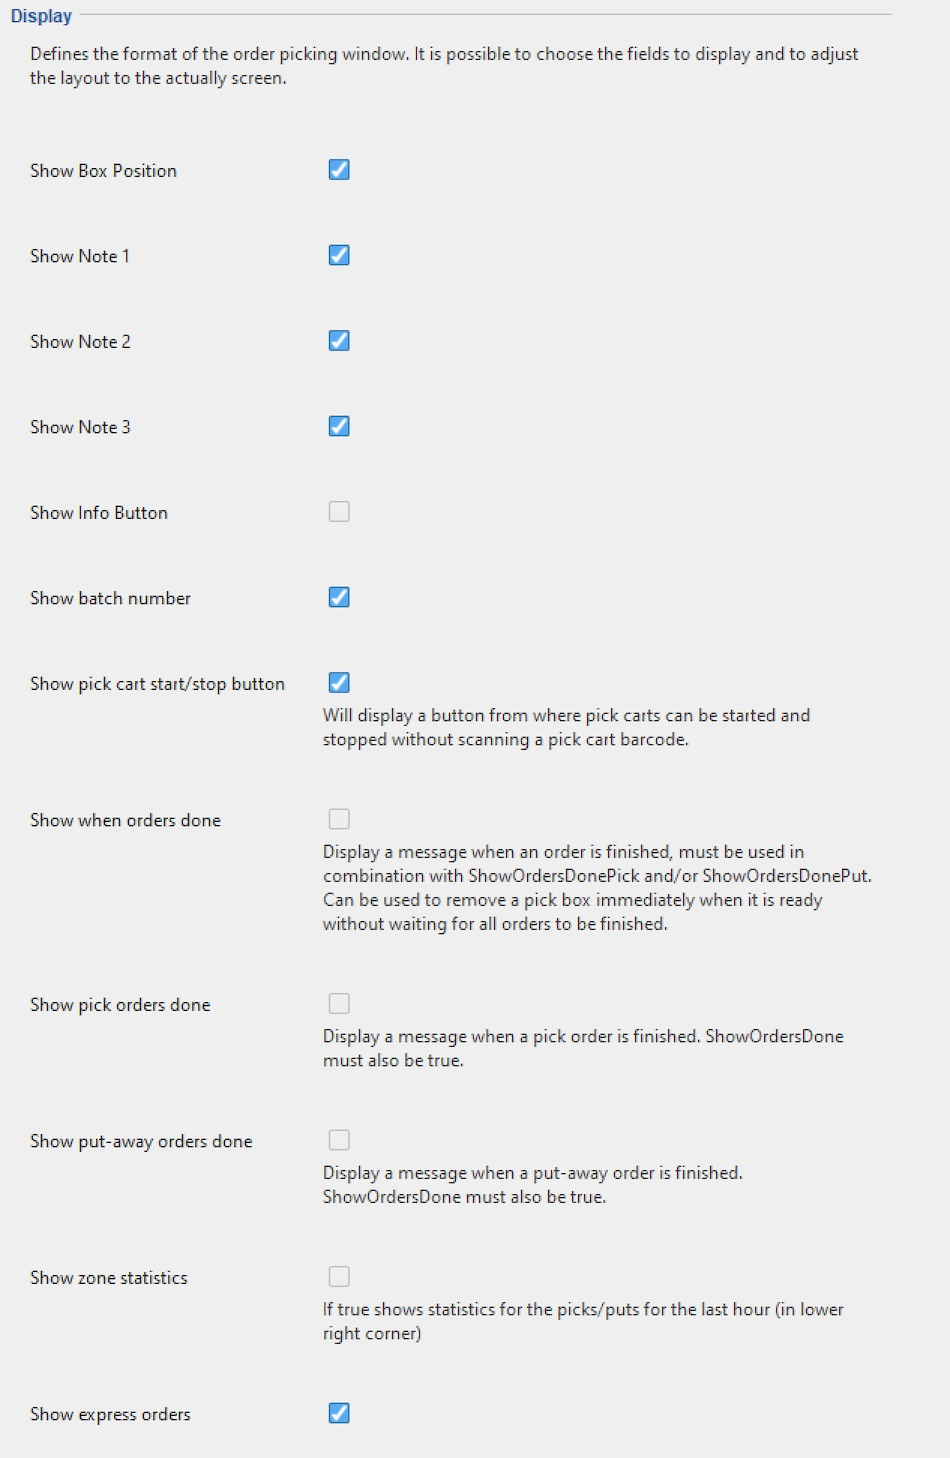
It is also possible to modify the text and button sizes. Be careful when adjusting the layout, it is easy to make a setup that will not fit on the screen.
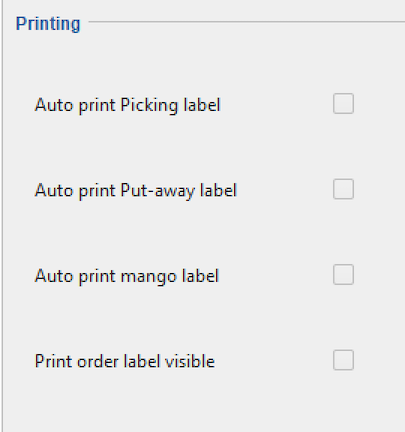
Printing
Enable automatic printing of labels and choose if print button should be visible.
Machine Control

Show Article Picture
The picking window may show a picture of the current picked item.
First enable the display of pictures.

The pictures must be stored, either on a web server with http access or on a shared folder accessible from the PC that will display the item.
The pattern is an URL and is used to define where the image is found. The simple format is like this:
file:%ArticleNumber%.jpg
%ArticleNumber% is replaced with the current article number. Specify the correct absolute path to the file. Prefix with “file:” or “http:” depending on the protocol.
In case the formatting is more complicated, it is possible to use Groovy scripting:
${'file:/Users/sos/tmp/' + article + '.png'}
The script must start with “$” and enclosed by “{..}”.
“article” is the variable that has the current article number.
This syntax allows more advanced formatting, for example if the article number includes a “#” that is not allowed in the path to the file, it could be removed by:
${'\\hostname\\folder\\' + article.replace('#','') + '.jpg'}
Advanced
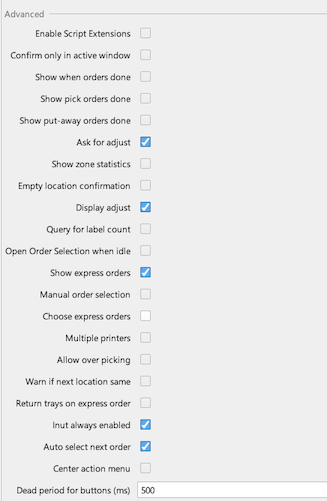
Enable Script Extension: This will load a script into the order picking window for advanced customizations.
Confirm only in active window:
Show when order done: Display a message when an order is finished, must be used in combination with ShowOrdersDonePick and/or ShowOrdersDonePut.
Show Pick Orders done: Display a message when a pick order is finished. ShowOrdersDone must also be true.
Show Put-Away orders done: Display a message when a put-away order is finished. ShowOrdersDone must also be true.
Ask for adjust: Ask for an alternative location if quantity is corrected.
Show zone statistics: If true shows statistics for the picks/puts for the last hour (in lower right corner)
Empty location confirmation: If true the user must confirm when a location is picked to zero.
Display adjust:
Query for label count:
Open Order Selection when idle: As standard the order picking window will just be greyed out, if there are no active orders. Activating this function, the Order Selection window will be opened automatically. This might ease the use in some cases.
Show express orders:
Manual order selection:
Choose express orders:
Multiple Printers:
Allow over picking: Allow the operator to pick more than specified by the order.
Warn if same location the same:
Return trays on express orders:
Input always enabled:
Auto select next order:
Center action menu: On some screen, the action menu may start partly outside the screen. Activate this function to fix the problem, by displaying the menu in the center of the window.
Dead period for buttons (ms): To avoid double clicking. If a pick is confirmed and the next pick is shown immediately after, it might be possible by accident to confirm more than one pick. Use the dead period to avoid that.