Basic Concepts using SHARK
- General Configuration
- Location Management
- Article Management
- Zones and location types
- Storage Strategy
- Orders and Transactions
- Work Processes
- Using Barcodes
- Serial Numbers
- User Management
In the following pages we will go over the basic concepts that are important to understand, in order to get the full benefit out of the system.
General Configuration
Numbers
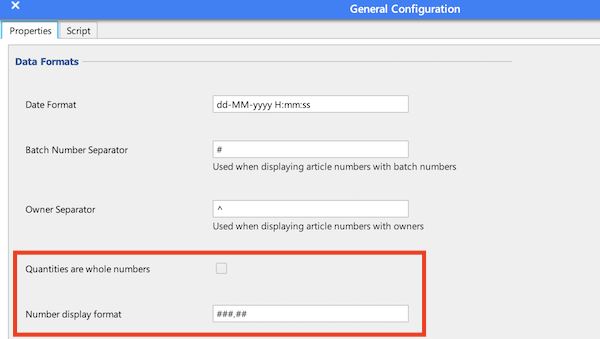
The default configuration for Logisoft is to use whole numbers for quantities. This means that the quantity stored on a location is for example 1, 2 or 3. This also means that host systems, only may send orders using whole numbers. Behind the scene, Logisoft is always using decimal numbers and it is easy to change the configuration.
Open the menu Maintenance -> System Configuration -> General Configuration.
- De-select “Quantities are whole numbers”
- Define the “Number display mask”, “#” is a digit and “.” is the location of the decimal point.
Examples:
###.## would display as 123.50
###.# would display as 123.5
Avoid using more digits than you need, it will take up space on the screens.
Date Formats
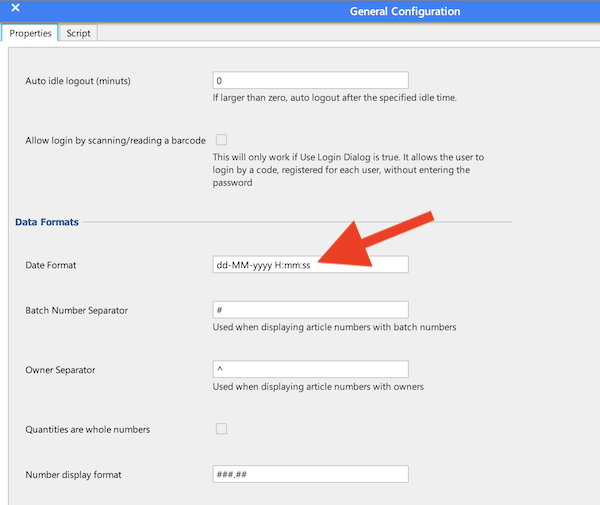
It is possible to change the displayed date and time format.
Open the menu Maintenance -> System Configuration -> General Configuration.
Change the “Date Format” mask to redefine the displayed format. Use the following codes to define the format:
| code | Description |
|---|---|
| dd | Day 1-31 |
| MM | Month 1-12 |
| yyyy | Year |
| HH | Hours 1-24 |
| mm | Minutes |
| ss | Seconds |
Location Management
One of Logisoft’s most important tasks is to keep track of where the articles are stored and where there is free space. This is accomplished by warehouse locations which are an area in the warehouse managed by Logisoft, each having a unique address. It is important to understand that Logisoft must know the layout of the warehouse, it is not impossible to store articles in a location not known by the system. This is important in order to optimally manage the location utilization.
The physical division of the ware house is hierarchical, where: articles are stored in boxes, boxes stored in trays, trays are stored in specific lifts (automats), and lifts are grouped into picking zones.
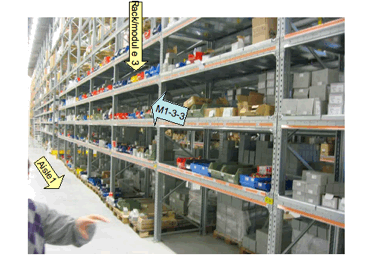
Example of location addresses. Here we are standing in aisle 1 looking at rack 3, shelf 3.
Storage Strategies
Different strategies can be defined for how locations are to be used. There are 3 basic types with individual advantages and disadvantages:
- Fixed locations.
- Floating locations.
- FIFO
For all location types in Logisoft, the same article can be put away in more than one location. For all new articles, Logisoft has a standard strategy that applies to the whole system, but apart from that each article can have its own strategy. Which means it is possible to choose the method best suited for the article type in question. If the articles stored, for instance, are mainly articles not requiring FIFO, the standard type can be set to floating, but for individual articles with an expiration date such as batteries or other articles with limited shelf life, the strategy is set to FIFO.
Fixed locations
Fixed locations is the classic way of managing locations. Here the articles are kept in the same location every time until something else is decided. From a purely practical perspective, this means that if a location goes down to “zero” (is emptied), it is still reserved for the article type in question. There is rarely any great advantages associated with this rather than for instance, using floating warehouse, but there may be practical reasons for always keeping an article type in the same location.
Floating
It is a standard that Logisoft supports floating locations, also called a chaotic warehouse, meaning that the same type of article can be stored in several different locations, and whose locations can be changed on a regular basis. Logisoft will suggest where an article can be stored and then keeps track of where the article is actually being stored. There is no guarantee that it will be assigned the same location when put away next time.
FIFO
Using this strategy will ensure that the article which has been longest in stock will be the first to be picked. All articles will be stocked with information on how and when they were put away. The FIFO strategy may be somewhat slower to use as it is not possible to just pick the nearest article. Furthermore it requires more space because an article must be put away in an empty location to avoid having different articles being mixed together.
The FIFO date used, is stored on the location.
For articles with batch/LOT numbers, the FIFO date is not the location date, but the date assigned to the batch number (typical an expire date).
Location types
A location in Logisoft always has a location type. A location type has a name and a size (length, height, width). The name of the location type is freely selectable. It could be for example “Blue plastic box” or “Pallet_1”. Pick a meaningful name. It will make it easier during daily use. For each article type found in the warehouse, you should state in what type of locations you want the article to be stored and possibly how many of the same articles there is room for in the same type of location. Please note that the same article can have several acceptable location types. In that case Logisoft will pick the optimum type on put-away, based on location, utilization and picking speed.
It is certainly possible to have several different location types of the same size. This can be used to navigate towards the desired put-away zone of an article.
Warehouse Zones
A zone consists of a number of locations where one or more operators work. If an order is started in one zone, then only the part of the order picked in that zone will be processed.
In ordinary shelves or pallet zones, one or more operators can work simultaneously in the same zone, whereas vertical lift zones only have room for one operator at a time.
A vertical lift picking zone is one or more vertical lifts being operated by one operator. For each picking zone there is one monitor, one bar code reader, one keyboard and often one label printer. Because of the short pause between when a vertical lift has delivered one shelf and the lift picks up the next, it is more efficient allowing one operator to operate more than one vertical lift at a time, typically 3-4 vertical lifts in the same picking zone is optimal. Logisoft will optimize the picking order, so that the next article picked, to the extent possible, will be picked by the next vertical lift that is ready with the next tray.
There are different type of zones:
- Standard storage as shelving and palles.
- Automated storage as vertical lifts or other kind of automation.
- Flow rack zones.
- Picking front for buffer storage.
- Mobile racking.
Zone for Standard Shelvings
This is a general location type covering ordinary storage type.
Zone for Pallets
General zone for pallets.
Zone with Automats
An automat zone contains one or more machine operated as one unit. Typical only one operator is operating in the zone at a time, although multiple operators are possible - but they will operate on the same orders. Pick and put-away is done from one shared PC or one PC for each automat.
It is possible to include shelving like flow racks in an automat zone. This is typical used for high runners.
Picking Front for Buffer Storage
This is a zone used as picking front for another zone where the articles are moved to and from when needed. The movement can be done manually by operators, for example moving pallets from a pallet zone to the picking front from where picking can be done at floor level. It can also be an automated warehouse using AGV’s or ASRS systems (Automatic Storage and Retrieval Systems).
Flow Racks
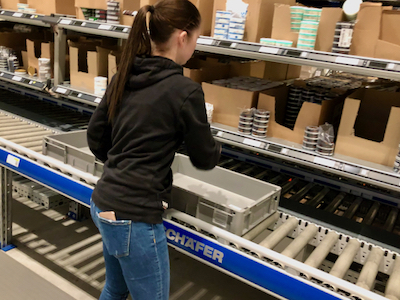 Picking from flow-racks.
 Picking from flow-racks using a PC screen and pick-by-light.
Location Addresses
The physical location of an article is specified by a location address. There are 2 standard formats. The short one is:
<zone><module>-<shelf no>-<coordinate on shelf>
An example of a location could be: A3-17-B4, which tells that we are in Zone A, the module is 3, the shelf is 17 and the article is found at the co-ordinates B4 on the shelf. Refer to section for an explanation of locations on a shelf/tray. If it is a vertical lift zone, A3 will be the name of the vertical lift.
-
A3-17-B4
-
Location on a tray/shelf
-
Shelf/tray number
-
Zone and Rack/Module
Locations on a fixed warehouse may have one additional level, an aisle number. Here the address will be:
<zone><module>-<aisle>-<shelf no>-<shelf co-ordinate>
For example:
B1-3-4-A1, designates zone B, module 1, aisle 3, shelf 4, and the location on the shelf is A1.
Whether the one or the other format is used depends on how the locations are set up.
Location Marking
Locations will typical be marked with a label that include the location address as text and a barcode. It is also possible to add check digits which is a 2 digit number, automatically generated by Logisoft that can be used as an alternative confirmation code instead of scanning a barcode.
Locations in automat trays
Vertical lifts (automats) use trays to organize the stored goods. A tray can hold quite a few different articles, which makes it practical to know where on the tray an article is located. A simple co-ordinate system is used to designate an article’s place in a tray. The tray is divided into rows and columns. From the front of the tray, left to right, the columns are designated by the letters A, B, C etc. The rows are referred to by numbers 1, 2, 3… starting from the lower left hand corner. In that way, the lower left corner is referred to as A1. This defines a ”grid” in the tray. The sizes, meaning the width of columns and rows can be set individually for each tray type.
Because the size of the grid has 2 conflicting interests:
- One location will always fill a complete number of grate fields. Therefore there will be more flexibility if the crate is small.
- The location designation becomes very long and thus impractical to use if the crate is too small.


Coordinates are used to designate locations of articles and boxes in vertical lift trays.
In practice, many trays are arranged in the same way, whereby the trays’ structure is designated as tray types (templates) having a name, and which can be used again and again.
Boxes are often used to store articles in the trays, thus boxes correspond to location types. It can either be real boxes that can be withdrawn from the trays or fixed divisions of the space in the trays.
There are a few simple rules to the locations:
- The size of the location must consist of a whole number of ”cells”.
- Generally, the height of the box should be the same as the tray’s height.
- One box may never be placed on top of another.
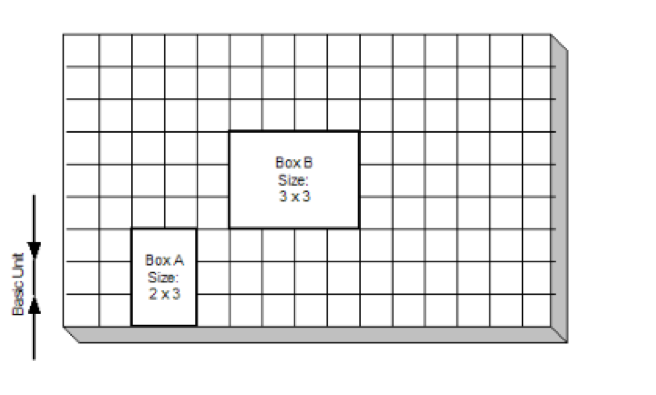
Examples of permitted box sizes in identical trays.
Locations alias
It is possible to make an Alias for the coordinate of a tray location. This is an alternative name which can be used if the coordinate description is not optimum for the application. You may, for instance, choose to call a cell named A4 for “4” or give it an entirely different name. The only requirement is that the name is unique, which means that no other location can have the same name. It is only the last part of the location name that can be exchanged in that way.
One or more locations for each article
Logisoft allows using as many locations as desired for each individual article. There are both advantages and disadvantages to using several locations. One of the advantages is that several locations give better space utilization. For example, imagine that the whole warehouse only has one location per article number, it will statistically be half filled (50%) assuming that you first fill the location and then pick it until it is empty. If more than 2 locations are used per article number, the warehouse will be 75% filled, because the one location can be used for another article when it is empty (if the warehouse uses floating locations). There is simply much space to be saved by using several locations. Other advantages can include increased speed, because Logisoft is better able to find an article quickly if it is located on several places and increased security if the article is distributed to several zones and/or vertical lifts.
The disadvantage of having several locations per article is that it may become more time-consuming to put away the articles as more put-always are required for each article type. Sometimes an order line will require 2 pickings to reach the desired amount for an order line.
Buffer storage and Replenishment
Large volume articles with high pick rates, can benefit from having an easily accessible picking location, for example in a vertical lift and a second buffer location in a more inaccessible parallel location. There are two ways of handle buffer locations.
- Store the goods in a dedicated buffer zone and has a another zone as picking zone. This requires the replenishment data to be defined correctly. This is the way to do it in Automats. The goods will be moved by replenishment orders.
- Store all goods in one zone and mark the locations used as buffers as buffer locations. Can be done from location management (whole pallets) or the Storage Manager (indiviual locations). Logisoft will then prefer to pick from the none-buffer locations, but if it cannot pick the whole quantity from a picking location, it will still direct picks to the buffers (to avoid emptying the picking location). The goods are typical moved by means of the replenishment list in the PDA.
Mirrored storage
One variety of the same article being stored in several locations is called mirrored storage where the same article is located in several zones. This way you can often avoid order consolidations since the total order can be picked from a single zone. But here the management of the system becomes more complex.
Location sequences
The location addresses don’t always reflect the optimal picking sequence. Therefore it is possible to control the order or the sequence, with a sequence number for each location. Generally the sequence number runs sequentially with the address, but the number can be changed if necessary. The rule is that the lowest sequence number is to be picked first. One example where you might want to change the sequence is in aisles where you might want to pick from the one side of the aisle first and then the other side on the way back. Another example could be a vertical lift where the tray number does not necessarily tell which trays are the closest or are nearest each other, the picking opening may be in the middle or at the top.
Each zone, aisle, module, tray has a sequence number that can be set in the configuration. If you want to set a sequence crossing zones and aisles, the best way to do this, can be to set the zone and aisle sequence number to the same and only use the module sequence number to define the sequence.
There are some limitations to the used sequence numbers:
| Level | Number Range |
|---|---|
| Zone | 1-255 |
| Aisle | 1-255 |
| Module/Rack | 1-4095 |
| Tray/Level | 1-255 |
| Coordinates in tray | 1-1048575 |
Work Groups
Work groups constitute a way of grouping zones, which work together. One work station (pc or terminal), can be attached to a work group. If you start a picking cart on a work station attached to a work group, all the picks that can be run in this work group can be started simultaneously. Simply put, the work group will work serially between the zones (relay picking), whereas you work parallel if the zones are not in the same work groups.
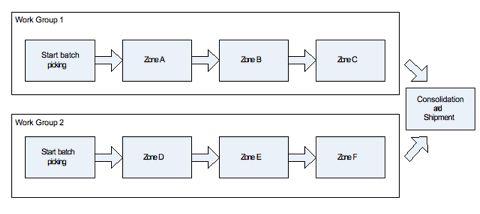
Example of 2 work groups where the order is being picked parallel, but where the work is done serially within the work group (relay picking). Within work group 1 a picking round is started, for instance, on a picking cart. The cart is given all the transactions found in zones A, B, and C. The cart picks first in one zone, then in the next etc. Another cart can be started up at the same time totally independent by work group 2, where other transactions for the same orders can be picked. The 2 picking rounds are first consolidated in shipment and packing towards the end.
Thus the work group can decide that a picking round started within the work group is done serially, one zone at the time, whereas the work between work groups is done parallel to each other.
If the same order is being picked simultaneously by several work groups, it is most practical that the order is picked at somewhat the same time, as it will normally be shipped collectively. For this purpose, Shark has one option for prioritizing an order such that, if an order is opened in one zone, it will automatically be given a higher priority in the other work groups.
Article Management
Articles or goods are the basic units being stored. Logisoft creates a database with a list of all the article types in the warehouse and the characteristics of each item, this is called the master data for the articles. It is not possible to store an article that is not first set up and defined in the system. Article types can be set up and defined without actually ever being stored in the warehouse. Setting up new article types can either be done manually or by importing the information from an Host System.
The minimum requirement of master data for an article is only the article number.
Article number
Every article type should be given an article number for unique identification. This number is often used as a bar code.
Rules for article numbers:
- All articles have an article number.
- Article numbers are unique; two article types cannot be assigned the same article number unless they have different ”owners”.
- Acceptedd characters in an article number are numbers and letters, spaces can also be used, but should be avoided if possible.
- There can be max. 50 characters for the number.
- There is no distinction made between big and small letters.
Description
Every article was described using text. This is just information for the user and can be used freely.
Stock Units
The stock in Logisoft is always in the base unit as defined by the Article Master Data. The base unit is specified for each article. Internal quantities in Shark is always kept in this unit and will be calculated back and forth, if the external unit is different.
The following base units are defined:
| Class | Units |
|---|---|
| Length | mm, cm, m, km |
| Weight | g, kg |
| Volume | ml, dl, cl, l |
Weight
It is possible to specify an article’s weight. The weight can be used by the system to calculate and ensure that the total weight capacity, for example in a tray, is not exceeded. Can also be used by Logisoft to figure out how much can be contained in a pick box and for calculate shipping weights.
Dimensions
It is possible to specify an article’s size. The size is used by the system to calculate how much vacant space there is for new article units at a given location and can, depending on the system structure, also be applied to compute the quantities that can be picked for a given box.
EAN codes
If EAN codes are to be used, this can be specified, and this will in turn allow Logisoft to recognize an article based on an EAN bar code instead of, or in combination with the article number.
Alternative article numbers
There are ways of specifying an ”alternative article number” which allows you to have 2 different article numbers on the same article, where the alternative article number may, for example, be used as bar code acknowledgement. Typical use is changing article numbers. In order to be able to still use the previous number during a transition period, it will be set up as an alternative number. It can also be used when using both an internal and a vendor article number.
Zones and location types
For all articles you need to specify where the article should be stored. If this information is not available, Logisoft cannot find space for the article on receipt of the goods. For a single article type, the following can be specified:
- In which zone you want it stored.
- Which location types the article can use.
- How many items can be stored on each single location type.
If the information is not available on receipt of the goods, Logisoft will ask for necessary information, minimum is a zone and a location type.
Package Sizes
Logisoft supports packing sizes for the article, meaning that the article can be stored and managed in packing units. Number and dimensions of the package may be specified.
The general rules used for handling different packages:
- Internally the quantity is always the “base unit”, for example pieces. The is true both for order line quantities and stock on locations. This means that if package size is changed it will not change the stock.
- When an order is imported from a Host, the package size can be specified. It will be converted to base unit and the package size will be stored on the order line.
- When the pick is displayed, it can be displayed with the package size specified on the order line.
- When reported back, the quantity will be recalculated to the package size.
Packaging sizes can be cumbersome to maintain. If this is not a facility being used, the following may largely be ignored! In that case, it is always the package dimension ”1” which Logisoft sets up by itself (called P1).
The package dimension “1” (called P1) is standard size and must be defined for all goods (done automatically). In Shark, the package dimension is a named unit, for example ‘P1’. This name is attached to a number specification defining the size. It is naturally a good idea, however, not a must that name and size are interconnected.
The reason why the package dimension has been defined for each individual article is so that properties such as height, length, width and weight can be ascribed to the package dimension. Thus, whenever an article is stored in a package, it is not only the single article’s dimensions that will be recorded, but all of the package’s dimensions.
Apart from the package dimension, you must also specify where in the warehouse (which zones) a given package size may be stored. More than one package size can be stored in a given zone. This means that in any location within the elected zone, all specified package dimensions may exist.
Batch or LOT numbers
Batch numbers, also referred to as “lot number”, are supported by Logisoft. A batch is typical a group of articles produced in one run. Batch numbers is a text string of up to 50 characters. It has also a date assigned, which can be the production date or the expire date.
If batch number is enabled for an article, the operator will be prompted for the number, while receiving or storing goods. Here it is also possible to specify the date. Picking can be done either for a specific batch number or the system will automatically find a batch number, which batch number then is selected depends on the general picking strategy.
Never mix the picking strategy when working with batch numbers, either always supply the batch number from the Host System (The Host decide or never (Logisoft decides). If mixed there is a risk that, that the Host might pick batch numbers already picked or allocated for other orders.
For standard locations, it is not allowed to mix different batch numbers of the same article type on same location.
Batch numbers can be used for completely other purposes, like using it for “article dimensions”, currently not supported by Logisoft (eg. color or size).
Serial Numbers
Logisoft supports serial numbers for stored articles. A serial number is a unique identifier for a specific article type (SKU), the maximum length is 50 characters. If serial numbers are used, it is defined at article level, this means that for each article it can be defined, if serial number is required.
The article has a property called Requires Serial Number, this must be set to use Serial Numbers for this article. The flag can be set in the Article Editor or it can be received as Master Data updates from the Host.
Serial Numbers can be used in four different ways:
-
Serial Numbers are registered when the article is picked. There is no registration of the number until the article is picked. This is the most simple solution to maintain and are recommended in most situation, where the need typical is that it must be known which customers receives what.
- Serial Numbers are registered at goods reception and reported back.
- Serial Numbers are registered both at goods reception and when picked.
- Serial Numbers are fully traced, also at which location, if the article is stored at more than one location. Note this can be time consuming to maintain and makes some operations more or less impossibly, like internal replenishment where the Serial Numbers must be identified.
The Host System can either let Logisoft decided which number to pick or the order line can define a specific number. If possible let Logisoft decides, it is much faster to pick.
Unless it is a requirement, it is recommended to use the simple model, where serial numbers only are registered at picking. It makes the daily life easier.
Storage Strategy
When receiving goods, Logisoft is able to suggest the storage location automatically. The calculations behind are rather complicated and are based on the supplied parameters, so the old rule, garbage-in-garbage-out really fits here.
Some of the parameter that might effect the suggested location:
- Storage strategy for the article (FIFO, Fixed, Floating).
- The zones where the article is set to be stored (replenishment data).
- The location sizes and location quantities. The system will try to find a location with minimum waste of space.
- If package sizes are used, they will also be taken into account.
- The ABC picking rate class. The system will try to find a location with the correct picking rate classification.
- If batch numbers are used.
- For automats special parameters are available for spreading goods between machines and trays. This is a trade-off between speed, space utilization and security.
Multiple Owners of the Articles
Shark supports that there can be several ”owners” of articles in the warehouse. This means that in practice the same article number can be used with different owners. The function is typical used where the same warehouse is used for different users/customers, for example in connection with 3PL.
General rules:
- Goods cannot have more than one owner per location.
- One item can only have one owner.
- If the same article number appears with different owner, it is regarded as different articles.
Orders and Transactions
When Logisoft is connected to a Host System, the picking and put-away is controlled via orders, which can be picking orders, put-away orders or more special order types as lists of articles for counting purposes. Every order can in turn be comprised of a number of order lines, which will typically contain an article for picking or storing. In order to execute the order, the warehouse needs to carry out one or more work operations, which in Logisoft is called transactions, they control from where the article is actually being stored or picked. It can be necessary with more than one transaction for each order line, although naturally you want as few transactions as possible. There may for example be 2 or more transactions if:
- The article cannot be picked from a single location.
- The article must be stored, but there is no room for it at one location.
For transactions, the following applies:
- When one transaction has been generated for put-away at a location, it reserves the requested goods at the said location. This means that other orders cannot turn up and “grab” the article. If the stock is insufficient and another order is to be given priority, the original order should be withdrawn, thereby cancelling the transactions for that order (See Error: Reference source not found).
- The time when the transactions are generated, depends on the system’s configuration. This may happen automatically on receiving the order, according to a schedule, based on delivery time or manually.
- There cannot be more than one storage transaction to the same location at the same time.
- You cannot generate transactions if the goods are not in stock or all articles have been reserved for other orders. However an order may be partly released so that the transactions which are possible may be generated.

An order comprises of a number of order lines, which again refer to a number of transactions.
Order types
The basic order types found in Logisoft are:
-
Put-away. An order which pulls goods out of the warehouse.
-
Picking. An order storing articles in the warehouse.
-
Stock management. An order adjusting the stock. This is an order generated by Logisoft itself in connection with adjusting the stock at each location. It is not possible to adjust the stock from a host system, since the host normally does not know the actual location of the article, which could have been distributed to several places.
For each of these types there are several order sub-types. Some of these types are standard types, which cannot be changed, but apart from that, new types can be set up, so that you may have different order types for export orders, production orders, internal sales, return goods, etc.
Note that an order can only have one type. You may not change the type from line to line. This means that it is not possible to mix put-away and picking in the same order.
Logisoft is pre-configured with a number of basic order types. The behavior of each type can be modified and new order types can be created.
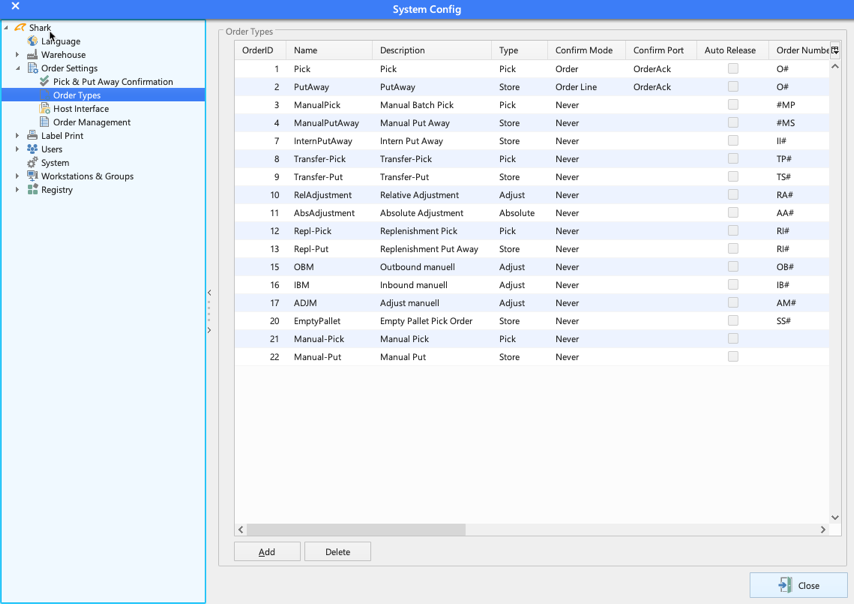
Order number and other information
An order may always have an order number and furthermore can have a delivery note number. An order must have a unique order number plus delivery note number within the given order type. This means that you do not have two orders with the same number, unless they have different delivery note numbers, but the same number may be found within different order types.
The order has some information linked to it, which can among other purposes be used in association with the order processing:
- Customer information.
- Delivery note number.
- Delivery address.
- Priority.
- Shipment information like preferred carrier.
Life cycle of an order
All orders have a status, and each order line has its own order line status. The total status of the order will normally reflect the single order lines, so that if, for instance, one order line is still outstanding, the whole order will be outstanding.
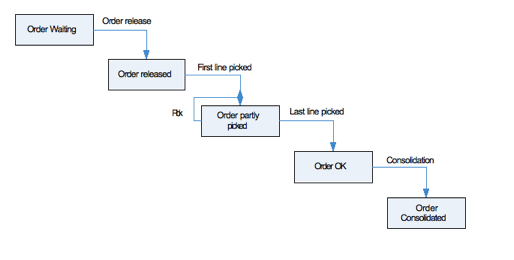 The order undergoes different phases in its lifetime.
The times at which an order shifts between the different phases are registered by Logisoft, so that it is later possible to see and measure the single order’s passage through the warehouse.
Status: Waiting
An order with the status of ”Waiting” has not yet been initiated, but is otherwise ready.
Status: Partly Picked
The status ”partly picked” means that part of the order has been picked (or stored), but that something is still missing.
Status: Back order
An order with the status of ”Back order” may only be partly picked or not at all, as there are not enough articles to one or more lines. There are several possibilities for handling this situation:
- Either you may store the missing goods, then the order changes to the status of ”Waiting”.
- If it turns out to be impossible to acquire the missing goods, the order can be started and as much picked as possible. Then the order may be open, until you complete it in Logisoft by saying OK, or by picking the remaining amount, when the remaining articles arrive.
- Another possibility is that only the quantity available is not enough, so that there are actually enough goods to fill the order, but there are other orders which have reserved the stock. In this case you may choose to re-prioritize which orders should be picked, and cancel the other order (remove its release) this will let go of the reservation that was placed on the goods..
If back orders are allowed, depends on the application. One strategy is to only sends outbound orders when stock is available. In that case, a back order status will indicate that there is a miss match between the Host stock and what is registered in Logisoft. The disadvantage with this setup, is that cross-docking is not possible at goods reception. Cross-docking is a feature where picking of missing goods for an order is done immediately at goods reception without actually storing the goods first in the warehouse.
Status: OK
An order where all lines have been picked completely. It is ready as such, but has not necessarily been through consolidation (packing, control and dispatch).
Status: Consolidated
Consolidation is when an order, where the single order lines were picked in different zones, is brought together to be controlled that everything has been done correctly, meaning that the article number and amount on the order are correct. After this has happened, the order gets a consolidated status.
Please note that not all installations use consolidation.
Status: Cancelled
An order can be cancelled, meaning that it will never be picked.
Order priority
An order always has a priority which can be used to sort out in which order, it will be processed by the system. The priority can be set based on the order type, it can be changed by another user, or it can be adjusted by Logisoft itself. Automatic adjustment of priority might happen, when an order has been started partly. Then it automatically gets a higher priority in order to ensure that the total order will be picked as quickly as possible and simultaneously in all areas. This is relevant if the order is to be picked from several zones and to be sent as a whole. Priority can obviously also be used for rush orders.
Back Order Calculations
An order resting in Logisoft, but which cannot be picked wholly or partially will be given a back order status, meaning that it may only be partially picked or not at all. When new articles are being stored, Logisoft will automatically update the order status including the remainder.
Calculations of whether there are goods outstanding against your order are made as follows:
(Stock of the article) Minus (The quantity necessary for released orders) = (Available stock)
If the available stock is less than needed to satisfy the order, the order remains outstanding.
Please note that it does not mean conversely that if there is no back orders outstanding against your order, that all orders on your system can be picked. If there are several orders that must have the same article, and they have not yet been released, the total quantity needed may very well exceed the available stock. The prioritizing of who will be getting the goods is determined by which orders are first released!
Internal Stock Transfer
A stock move takes place when the articles are moved internally between 2 locations in Logisoft. A relocation order consists of 2 orders with the same number, but different types, namely a pick and a put-away.
A transfer order can be set up by a Logisoft user or set up automatically following an automatic replenishment process from a buffer location, another zone or an external vendor.
Release and Transactions
Transactions can be generated at different times depending on the system configuration and set-up. It is usually advisable to generate the transactions as late as possible in relation to when the order is to be picked, this in order to place as few ties as possible on the warehouse. If the orders arrive well in advance of their picking, there may not even be enough goods in the warehouse to generate transactions for all waiting orders.
Order release with the creation of transactions can happen when:
- When the order is being released manually. This happens in the release module and is normally the recommended procedure.
- Automatically immediately when the order is received. This might be the solution for a smaller installation where it may be too difficult to use order release.
- Automatically using the order delivery date.
- Using Tour Management.
Whenever transactions have been created for an order, it has been released. Then it is ready for picking in the warehouse.
Work Processes
The most important processes in a warehouse is:
- Goods Reception of incoming articles.
- Storing the articles in the warehouse.
- Picking the articles.
- Shipping the articles from the warehouse.
Goods Reception
Incoming goods for storage must be registered first and then be directed to the right areas of the warehouse. This is a function which can be skipped in small warehouses, but if there is more than one zone, it may be convenient to have a goods receiving function. In the goods receiving the following occurs:
- The article is registered, typically against a purchase order, which the ERP/Host system has sent to Logisoft.
- Quantity and quality are controlled.
- The article may be put into a box, stored on a pallet or the like and recorded with a bar code so it is easy to use during the rest of the process.
- For new articles, any product information (master data) not already known will be registered, for example which location type should be used and which zone(s) the article should be stored in.
- If the article can be put away in several zones, it is decided which zones to use. The system will always suggest one, but this may be changed on request.
Put-away is typically more time consuming than picking, and an obvious advantage in using a dedicated goods receiving function is that part of the work is actually moved from the actual warehouse zones, so that put-away can be done as quickly as possible. Not least in vertical lift zones, where put-away can cause a bottle neck, will this be a big advantage.
Storing the Articles.
This is the movement of the article from goods reception to the final storage.
Picking
Picking articles can be done in several ways:
- Order based picking by PDA Used by mobile operators working in static shelving.
- Order based picking by a PC. Used where the operator is stationary, like for automats and flow rack zones.
- Picking without orders in shelving.
- Picking without orders in automats.
Picking strategy
If there is more than one zone and a given order must be picked from several zones, there are several ways to handle this:
- Serial picking.
- Parallel picking.
- Parallel picking without consolidation.
Serial Picking
The order starts in a zone and is passed to the next, including the already picked goods which follow the order around. The order is typically accompanied by a piece of paper or a label.
Advantages:
- There is no need for picking the order from different zones (no consolidation needed).
- Simple to use.
Disadvantages:
- Takes longer time overall to pick as this cannot be done simultaneously in multiple zones.
- More “moving around” of goods, as they are all following the order around the warehouse.
- Bottle necks may arise in consolidation.
- Shark does not always decide which orders are to be picked, which gives less possibilities to optimize the picking.
Parallel Picking
The order is being picked simultaneously in several zones.
Advantages:
- The order can be picked faster as it is treated independently in each zone.
- Independent work can be done in the various zones. Which means that you don’t have to wait for the order to be picked in another zone.
Disadvantages:
- The articles making up an individual order must be gathered (consolidated) from the different zones. This is an extra work process.
- There is a need for an order consolidation in order to bring the articles from the various zones together.
- Requires more administration as you must make sure that all zones are working in parallel.
Parallel Picking without Consolidation
The disadvantage of order consolidation when picking in several zones at the same time can be avoided by not collecting the order, but instead send the articles individually from each zone.
Advantages:
- The order can be picked faster as it is treated independently in each zone.
- No need for consolidating and sorting of the goods.
Disadvantages:
- Shipment is sent in several packages.
-
Bad utilization of shipment boxes.
- Probably greater shipment costs. This, however, is not necessarily so, as goods from the different zones can, possibly advantageously, be sent by different modes of transportation.
Configuration of Picking Strategy
The picking strategy can be configured using some parameters.
Registry → Orders → PickingStrategy
| Parameters | Value | Notes |
|---|---|---|
| UseNewReleaseStrategy | 1 | Set to 1 for the latest version of release strategi. |
| General | 1/2/3 | 1: Wise (*), 2: Empty Locations<, 3: Best Fit</p></td> |
| WiseBestFit | 0/1 | |
| LocationStrategy | Default 0/1/2 | 0: Fixed, 1: FIFO, 2: Floating |
The Wise strategy uses a special concept where each location has an ready type code (1 to 5). This can be used to divide the warehouse into areas, more detailed than zones. Using the Wise strategy the following applies:
- Try to pick everything from one area if possible.
- Search first in area 1, then 2 etc.
Default area types:
- Fast runners.
- Automate.
- Flowrack.
- Shelving.
- Buffer.
Consolidation and Shipment
Consolidation is done from a PC read more here.
Replenishment
Replenishment is the proccess of filling picking location from buffer locations.
A simple way to make the replenishment is by the PDA and the replenishment list.
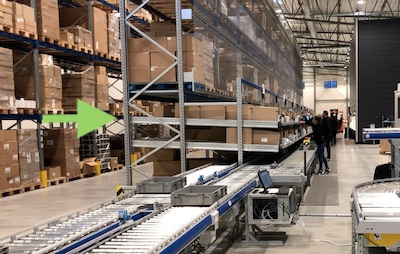
Example of flow-racks filled with goods from pallets just behind.
Using Barcodes
Barcodes may with great advantage be used in Logisoft, some of the functions using bar codes are:
- Checking whether the right article is being picked by test reading the barcode (either article number or EAN number).
- Checking whether picking is done to/from the right location by reading a bar code at the location.
- Checking whether picking is done to/from the correct order on reading a bar code on the order or the box in which the order is being picked.
- Acknowledging that a function has been completed, for example a pick where the alternative would often be pushing a button or a touch screen.
- In order to activate a pick cart. Scanning the bar code on the cart will automatically activate it without you having to open a special window..
- In order to activate picking into a box or put-away into a box simply by scanning the bar code.
- Special functions such as label printing can also be activated by special bar codes.
The fact that Logisoft is able to use bar codes to activate special functions is because the bar codes have been encoded with special characters, which Logisoft is able to recognize, thereby knowing that, say, a pick cart and not an article is being scanned. Therefore it is important that it is Logisoft which prints labels for boxes and pick carts etc., since the bar code would otherwise not contain the right information. Shark has integrated numerous functions for the printing of bar code labels.
Serial Numbers
Logisoft supports handling of serial numbers in different ways. The strategy is set for each article as part of the Article Master Data.
Four strategies are available:
- Register the serial number when picking.
- Register the serial number when storing/receiving.
- Register both when picking and when storing.
- Register always and trace where the specific article number is stored (which location).
Serial Numbers are supported from Order Picking by PC or PDA, Goods Reception using the PC client and by using Manual Transactions from the PC.
In general, there is a check for duplicated serial numbers. For example it is not possible to receive the same serial number 2 times in the same order. It is not checked if the same serial number has been seen before. This is necessary to allow receiving return from previous sales orders.
Register when Picking
This is the typical used strategi. Articles with serial numbers are scanned when they are picked by an order and thereby it is registered who receives which numbers. This is the most basic requirement for serial numbered items and purchase orders.
The serial number is reported back to the Host System and is registered in the transaction log.
It is a simple strategy to implement and do not require too much resources of the warehouse.
Register Incoming Goods
When goods are received for a specific inbound order, it will register the serial numbers. Later on it is possible to identify on which purchase order the specific serial number is received.
The actually registration can be done either at goods reception or when the serial number is stored on the final location. Choose which one best fits the work flow.
The received serial number is reported back to the Host System and is registered in the transaction log.
Both Picking and Receiving
Register both when receiving and picking. The actually location is not registered.
Traced Serial Numbers
This is the most complex strategy and only recommended, if it really is needed. It will register serial numbers both at goods reception and when picking and it will also register, where the serial number actually are stored (the location).
The advantages with this, is that it allows picking of specific serial numbers. An outbound picking order may for example include specific serial numbers to be picked.
The disadvantage is that it is more complex and time consuming to handle. For example if there is a quantity difference during stock taking, all articles have to be scanned to find out what is missing.
There are also some functions that will not work as expected, for example:
- Replenishment from buffer locations.
- Simple move of an article.
- Increase stock at stock counting.
Serial numbers can’t be changed. The work around is to use Manual Transactions to pick the item and store it again with the correct serial number.
The trace strategi can only be activated if there are no stock for the article.
User Management
Logisoft has a system for user authentication and control of user rights.
Logon
When Logisoft is started, a logon screen appears. This can have two layouts picked from the configuration. The standard configuration is showing one button for each user. The button can easily be used from a touch-screen. If the user has been given a password, a password screen is shown, which must be filled out correctly in order to continue.
If there are many users, the buttons are not very expedient, and instead you may choose that you need to write a name and eventually a password in a dialogue shown when pressing “login”.
It is also possible to logon by scanning a barcode. Two methods are supported:
- Logisoft prints a special barcode for each user, the barcode has encoded information including password that allows immediately logon by scanning the barcode.
- A special barcode will open the login dialog, from where another barcode with user id can be scanned. This is a simple way to scan an employer card without the need of a keyboard for login.
A third option is to use an access card in combination with a card-reader (typical connected as a keyboard device to the PC using USB). The code of the card can be recorded in the user setup screen and later be detected, when the card is read.
Create new Users
Create a new user from the System Configuration. Right click “Users” and select “Add User”.
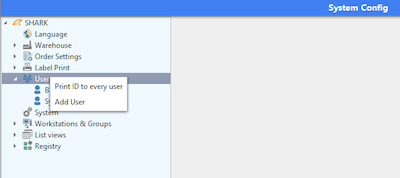
The default name is “New User”.
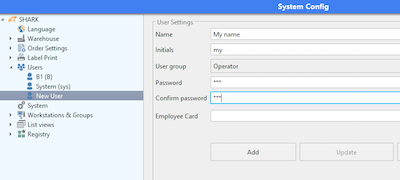
Enter the required information for the user, initials is required.
Enter a password, leave it empty to login without a password prompt.
Press “Add” when finished to create the new user.
The field “Employee Card” can be used if an RFID scanner is attached to scan a user access card as an alternative to the normal login.
It is also possible to print a special barcode with the login information (requires an attached and configured label printer). The smart think about this is that the user can be changed without first logging out. Just scan the barcode and the current user will be changed.
Some other features can be used from the “General Configuration” menu.
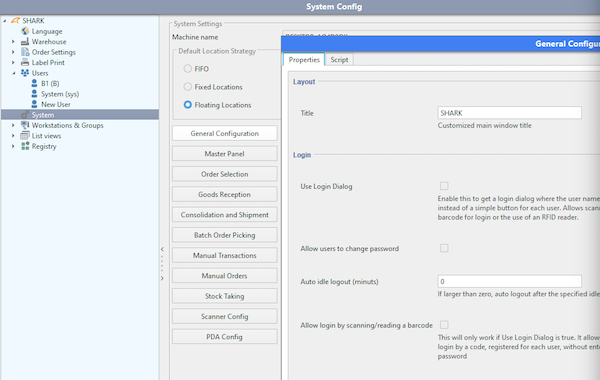
Use Login Dialog: Instead of the default buttons for each user, this will display a standard login prompt. Required for scanning employed cards.
Auto Idle Logout: Set a timeout period for auto logout if the system is idle.
Create Special User Groups
It is possible to define special user groups with dedicated user rights and it is possible to change the access rights for the default groups.
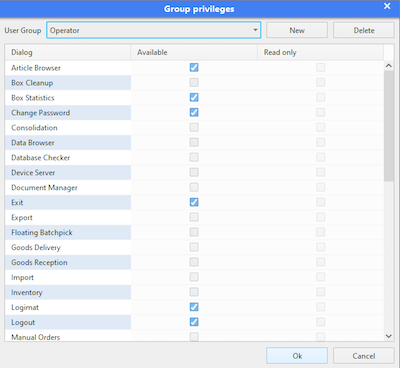
Each available functionality can be selected as accessible and there is a read-only option that will limit access to view only for the user.
Restricting access to certain trays
Feature used to control who can pick and store from specific trays in automats. Trays can be restricted so only some users are allowed to retrieve the trays.
Auto Logout
The Logisoft PC client can be configured for auto logout after a certain idle time.
