Getting Started
- Start-up and log on
- Change the Default Language
- Creating locations
- Article Master Data
- Store the Articles
- Create an Outbound Order (PDA)
- Create an Outbound Order for Automats
- Add more Users
- Setting up Work Groups
- Setting up Workstations for Hardware Control
- Define labels
- Connect to a host system
To get the most out of Logisoft, it is important to have a clear strategy on how to use the system. There are many ways this can be done and the optimal solution depends on a number of things, such as which article types you intends to store, expected pick frequencies, who will be the users, future requirements etc. This article will review some of the considerations and preparations that should be made before starting up.
One issue is whether the warehouse is already in use or if you’re starting with an empty warehouse. If the warehouse is in use, then there will naturally be a number of things, which cannot easily be changed, and it will be convenient to find a way to transfer the existing information to Logisoft. I general, it is much easier to start with an empty warehouse without any restrictions.
In the following we will step by step show the basic configuration of a new system and discuss some of the considerations to make.
- Start and Logon.
- The warehouse is divided into zones.
- Set up trays and shelves.
- Set up locations to which the articles are to be put away.
- Set up/load master data, for those articles which are to be put away.
- Set up users.
- Work groups must be set up.
- Define labels, if necessary.
- Establish an interface to a host system.
Start-up and log on
Logisoft is normally started with the Logisoft icon on the desk top or from the Start menu:
Start → Programs → Logisoft
To use Logisoft, you must log on to the system, this controls the user rights and logs actions taken by the logged in user.
After installation Logisoft, there will be one “user” called ”System” with the password ”shark”. The system user has the privileges to changes anything and should due to this be avoid for general use. This user name is entered the first time you log in. The system user may later be deleted or the password changed.
Push the [System] button and enter the default ”shark” password.
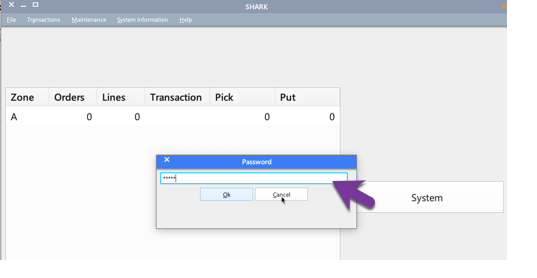
We will later look at how to create new users and define privileges for each user.
The Start-up screen
When the user has logged on, a start-up screen is shown from where the most important functions are chosen using large buttons other functions may be reached from the menu bar up above.
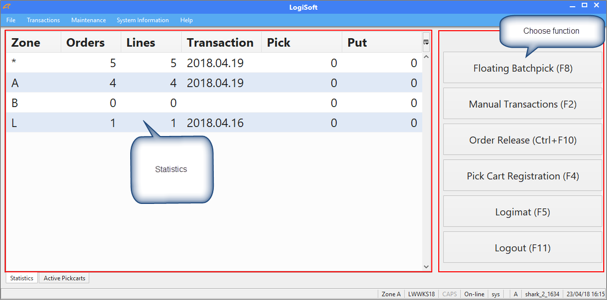
Main menu after logon.
The menu above is divided into logical groups:
Statistics: On the left, a number of statistical figures are shown.
Files: Log out here, Logisoft is turned off, and there are some file related import/export functions.
Transactions: You can find all operations related to pick and put-away under transactions.
Administration: If the system configuration is changed, new ones set up etc., this will be done under Administration [management]
System information: Transactions log, system log, statistics and other general information are found here.
Help: Online help system and information on which Logisoft versions are being used.
Order statistics
In the left side of the startup picture, several pieces of statistical information are shown, which can be used to gain a quick overview of where there is work to do.

-
The symbol ”*” shows how many released pick orders currently are waiting. It is released orders, where picking has not yet been started.
-
From each zone, you see how many of the total released orders that will be processed in this zone. Please note that the sum may be bigger than the total, since an order may operate in several zones.
-
Here you see how many of the released lines that have not yet been picked (awaiting). Total and for each zone. The sum can also be larger than the total if an order line has more transactions in several zones.
-
How many put-away transactions that have been done in the last hour. Total for each zone.
-
When the last pick or put-away was accomplished in the zone. Based on “*” shows the most recent time of picking or put-away of articles in the warehouse.
-
How many picks have been done within the last hour. Totals and for each zone.
Change the Default Language
The default startup language is set at installation time. If it does not match what is requested, it can changes from the menu: Maintenance -> System Config -> Logisoft -> Languages.
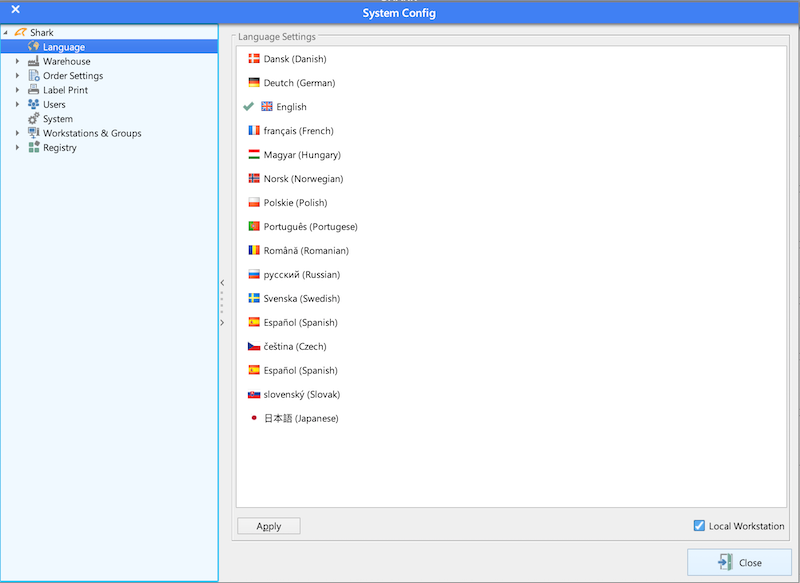
Double click the language to be used and press “Apply”. If “Local Workstation” is selected, the language will only be changed for this PC else it will be the new default for other PCs as well. Change the language will first take effect after restart.
Creating locations
A basic feature of a WMS system is to keep track of where the articles are stored and how to find free space. This is accomplished by warehouse locations which are an area in the warehouse managed by Logisoft and having a unique address. It is important to understand that Logisoft must know the layout of the warehouse and it is not possible to store articles in a location not known to the system. It might seem a little complicated to define the location structure, but it pays-of later and typical something that only have to be done the first time and if the physical locations are changed.
The physical division of the warehouse is hierarchical, where:
-
Articles are stored in locations, each location has a location type. A location type has a physical size, like a pallet or a certain box type and other properties.
-
The locations are grouped by trays (carriers).
-
Trays are grouped by modules.
-
Modules can optionally be grouped by Aisles. A module can also be a vertical lift.
-
Aisles or Modules are grouped by zones.
Read more about locations here.
Defining Zones for the Warehouse
Logisoft supports both static shelving and automated warehouse equipment. This requires that LogisoftS knows the precise layout of warehouse to work probably.
The warehouse is divided into one or more zones. The purpose of the zones are:
- To create a limited work area for the individual operators.
- Divide the warehouse into different physical areas.
- For defining buffer zones used for replenishment of other picking zones.
- Define zones for special use, for example for cross docking in goods reception or inspection of incoming goods.
Fixed warehouse zones may be covered by one or more employees with either PDA’s or picking lists.
Typical only one person at a time can work in the automated zones.
The naming of the locations are also defined at this time. This cannot be done after the first location in the zone has been created! The zones are fixed and are difficult to changed once they are in use. It is therefore important to make it right from the beginning.
Step 1 - To create a new zone.
- Open Maintenance -> System Configuration -> Warehouse.
- Right click the mouse on “Warehouse”.
- Choose the type of the zone.

After the zone is created, change the name:
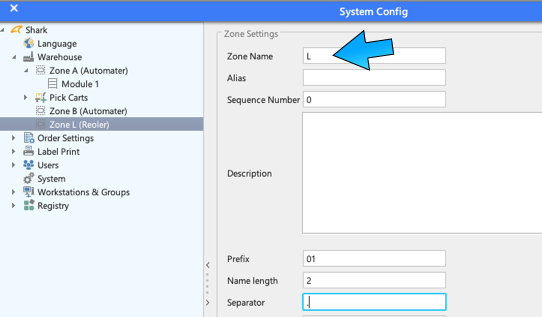
Now it is also time to set the syntax of the location naming. This is the 3 fields “Prefix”, “Name Length” and “Separator”. It defines the name of the zone and the separator between the zone and the module.
Creating Modules
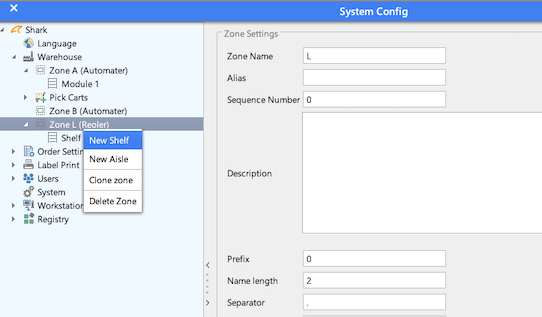
Modules are always numbered and it is not possible to change this to a textual name.
For the following the modules, it is possible to clone an already existing one.
For the module, it is also defined how the location address structure looks like. Get it right the first time and it is recommended when the first locations are created, to check the location addresses before proceeding (this can be done from System Information -> Report)
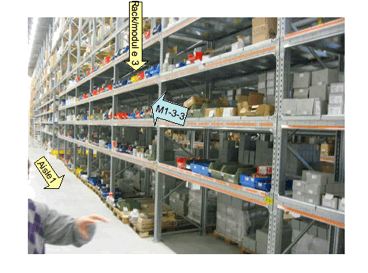
Example of location addresses. The picture shows aisle 1, at rack 3, shelf 3.
Defining Trays, Location Types and the Locations
Vertical lift trays and rack/module shelves.
Remember that only types are being set up. The actual locations will not be set up until later. The idea in first setting up a tray type is that it can easily be used several times. Therefore you only need to ”draw” it once. Some standard tray types may already be available for use.
Step 2. Open ”Tray Templates”

Step 3. Set up location types (boxes).
Before you are able to define a new tray/shelf, you must first set up the boxes (location types) in the trays. See under ”Available boxes”. If the desired box dimension is not available, push [New] to set up the box. Then you will be asked to enter a location cart type name. When this has been done, select the box again from the list of boxes, and enter the dimensions on the box, which is done in millimeters.
Step 4. Set up a new tray type.
Now the necessary boxes are available.
Push [New] (Tray type) and fill out the menu. First, select the tray size. The tray height is set in mm, and must be correct, so that the requested boxes can be on the tray. The name of the tray may be released, but pick one that is practical to remember. Then set the next 2 module dimensions, width and depth of the tray. This determines the size of the “network” the tray is divided into. Be careful not to select too small a module dimension, since it gives very long location addresses and makes the system slower. Typically, a tray will be divided into a number of larger modules, for example into 1/16, so that if the width is 2500 mm, the module dimension is set at 2500/16=156 (always round down if the result isn’t whole number).
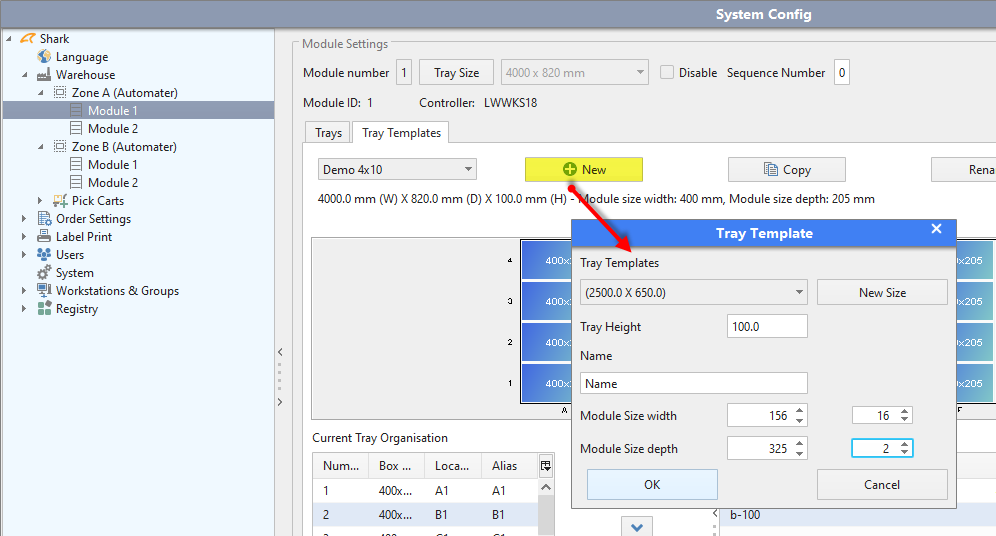
Setting up of locations
Once a basic structure along with trays and shelves have been defined, the final locations may be set up.
Step 1
Open Administration -> Systems Configuration -> Warehouse -> Zone -> Module.
Now, return to system configuration and select the previously set up module.
Step 2
Set up tray/shelves
It is now possible to place the previously set up tray type on each shelf/lift shelf in the module.
This is done by defining which tray type is to be used for which module/rack number. As soon as a tray type has been placed on a shelf, the actual warehouse locations are being set up.
See also under the menu item System Information -> Box Statistics, where this will be evident, when new empty locations are set up.

Location Setup in Vertical Lifts
If you do not have automats, this section can be skipped.
To make the most out of the Vertical Lifts, it helps if you have a good idea of the required capacity for the automat area. The normal and most effective configuration is that only one operator works at a time in an automat zone. The capacity is the number of picks to be accomplished over a given period of time. Finding the maximum requirement, meaning how many picks there needs to be able to be picked during the busiest hours. If 250 picks are to be picked per hour in the automats, during the busiest hours, and you expect being able to pick 120 per zone, you must accordingly have at least 3 zones. Here it may be important to estimate whether the needs of the computed capacity cannot be changed, whether some orders may be handled at a different time or if some orders can be delayed, for example by prioritizing the individual orders. Generally, there is no reason to divide the warehouse into more zones than necessary, whereas it is practical to have many zones during busy times, it may also be a disadvantage at other times.
It is possible to group 1 or more zones into 1 work group and thereby having 1 operator operating multiple zones. Work Groups can be reconfigured, but not while in use.
If there are articles with a very high turnover and of proper size, it will often be smart to pick them in automat zones, but placed outside of the machines, for example in flow racks or on pallets on the floor. In practice this is done by defining a virtual automat in the zone.
Articles with high pick frequency can be placed in the different lower trays of vertical lifts. When the system has been in operation for a while, it controls this by itself, but during start-up there is no data yet available for this computation.
If articles have a relationship to one another in such a way that they will often belong to the same order, it is an advantage to store them in the same tray.
Trays in vertical lifts may be used in many ways. A few simple rules might help here.
Use if possible a standard modular measurement, so that you start with a small box, and then make one which is twice that size, etc. This makes it much simpler to design and easier to modify existing layouts. You may, for example, exchange two small ones for one that is twice as big.
Try to design with “one pattern” of different sized boxes. This makes it easier to find the right box based on the screen picture.
Estimation of Capacity
Estimating how many picked articles that can be handled per employee will depend on several parameters.
For automated zones:
-
How many vertical lifts are in the zone? If there is only one, there will always be waiting time for the next tray, if there are many vertical lifts, there will be little or no waiting time for the vertical lifts. Three machines will typical be sufficient to keep one operator occupied.
-
How much time is needed to pick the article (handling time). Should the articles be counted, put into plastic bags, have labels attached, which are all things that take time and limit speed.
Article Master Data
If the dimensions and weight are available for each article, it may be a good idea to store this information in Logisoft. This will enable Logisoft to make smarter decisions at put-away process.
When possible the following rule is recommended: One article type (SKU) for one location. For mixed-locations Logisoft cannot handle free space management and it more difficult to pick from a location that contains multiple article types. The default location strategy is one SKU for one location.
When a new installation is put into use, it is often necessary to load master data for the articles which are to be used. Master data typically constitutes an article number, article description, EAN code and other article information.
How this is done, will depend on how the installation is configured. If there is hook-up to a Host or an ERP system, data will often come from there automatically, and nothing else needs to be done.
It will also be possible to import data from a file via menu item File -> Import.
The basic, but also time consuming way of setting up articles is in the ”Article Editor”.
Step 1. Open the Article Editor.
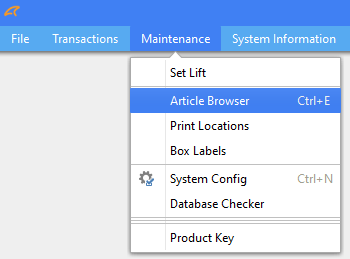
Step 2. Set up a new article.
The new article can now be set up by entering an article number and a name. Then push “Apply”. Apart from this basic information, here you will find much further information on the article which may be added. This could be for example where and how you want the article to be stored or information used, upon receiving the article, to find the right space for the article.
Try for example to create 3 articles that we later can store in the system, add an article description of own chose:
- AN1000
- AN1001
- AN1002

Store the Articles
We can now try to store the articles using “Manual Transactions”. This will store articles in the warehouse, without orders.
Read more about Manual Transactions.
Check the Transaction Log
TBD
Check the Stock Report
Create an Outbound Order (PDA)
TBD
Create an Outbound Order for Automats
TBS
Add more Users
Set up the first users. It is usually smart to ensure that the various job functions, have access only to what is necessary. This is done by limiting access rights.
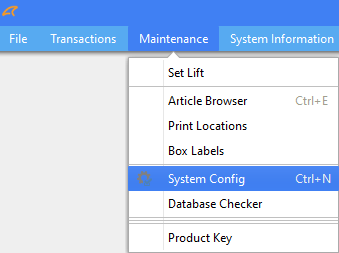
Step 1. Open Systems Configuration.
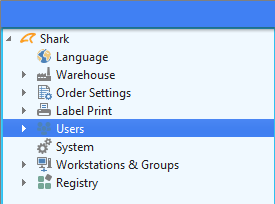
Step 2. Select Users.
Now, select ”Users” under “System Configuration”.
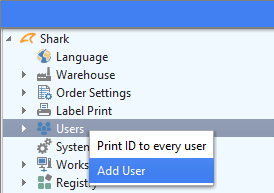
Step 3. Set up a new user.
Right click ”Users”, and select ”Add User”.
Step 4. Enter information about the user.
First click “Add User”, enter the necessary information, and click [Add]

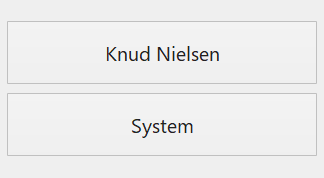
Subsequently the new user will be available and show up be on the logon screen as:
Setting up Work Groups
If you need to use more than one zone, it is important to have defined the correct work groups for the system to function correctly. The work groups may be used, for example, in connection with starting pick carts and the like which will be used in several zones.
Step 1. Open Systems Configuration.
Open Systems Configuration -> Work Stations and Groups -> Work Stations and Groups
Right click “work stations” and select ”Add workgroup”.
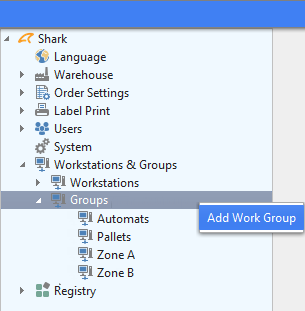
Step 2. Enter information on the work group.
Select the new work group, give it a name, and select the zones belonging to the work group. Then push “Apply”.
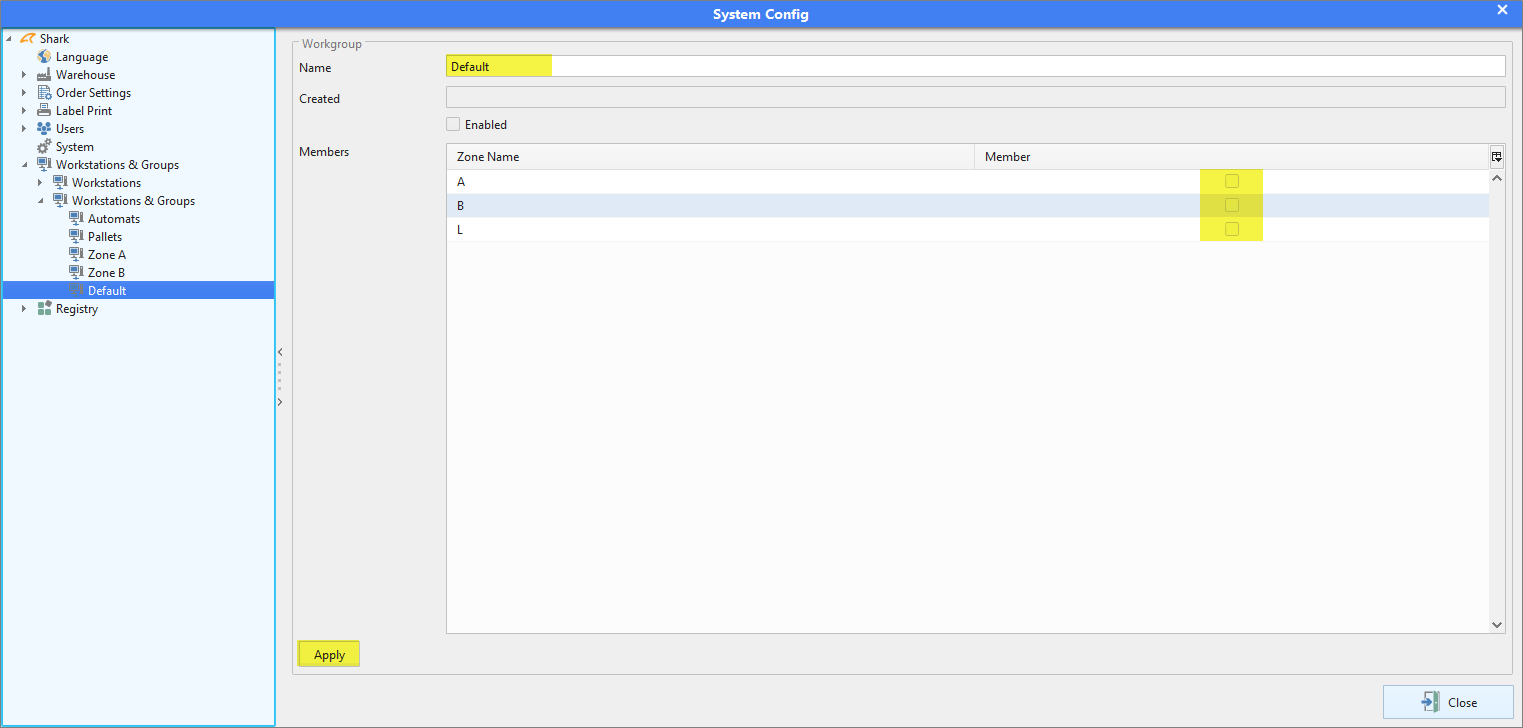
Setting up Workstations for Hardware Control
Some workstations are used for specific purposes, like controlling hardware like one or more vertical lifts (automats) or printers.
Open the workstation configuration panel from
Open Systems Configuration -> Work Stations -> Work Stations
Setting up control of a vertical lift
Only one workstation is allowed to control one automat, you can either have one workstation to control all vertical lifts in a zone or one workstation that control all lifts.
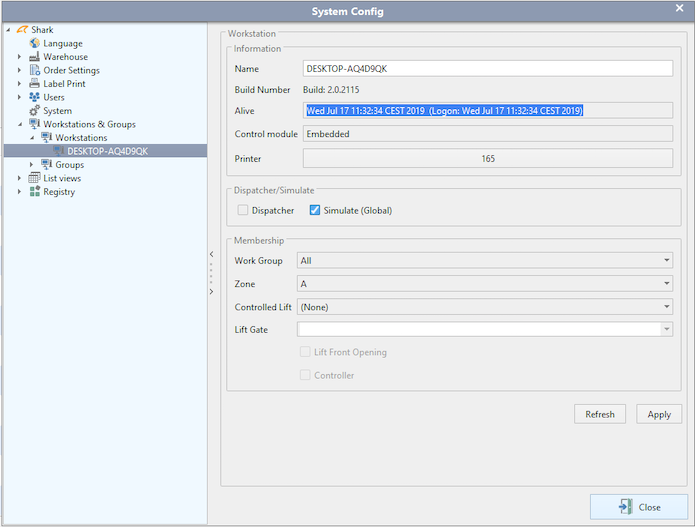
Set the following:
Work Group: Select an already created work group that will be used. That work group must contain the zone(s) that the lift that are going to be controlled is a part of.
Zone: Choose the zone where the vertical lift belongs.
Controlled Lifts: Select the lift that this workstation is controlling or “All” if there is only one workstation for all lifts in the zone.
Lift Gate: If the lift has multiple openings, you must also choose the opening this workstation is related to. One workstation is required for each opening.
Lift Front Opening: Deselect this, if the opening in the back of the machine, then the displayed layout will be mirrored.
Define labels
Set up label templates for those labels which could not be printed.
For each PC from where labels will be printed, a label printer needs to be installed and a label template must be linked to the functions from where the printing is done.
Labes are set up under ”System Administration” [systems administration] and ”Label udskrift” [label print]. How this is actually done in practice will depend on the printer type, and when the labels are to be printed. Here follows a general description of the procedure.
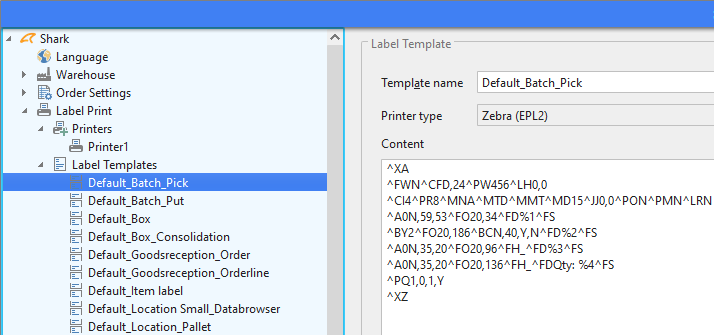
Step 1. Set up labels for each printer type.
A template must be set up for each printer and label type combination requested for printing. You may use the same template for different purposes, if they otherwise look alike. Templates are written in the printer’s printer language, you may however, often use a program which comes with the printer in order to generate the correct codes.
Templates are set up under Label Print->Templates
Step 2. Set up printer.
This is done from the PC that the printing is done from!
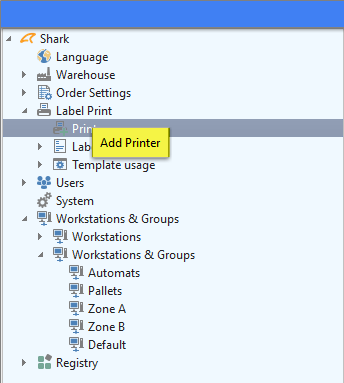
Using the mouse, right click printers, and select “Add Printer”.
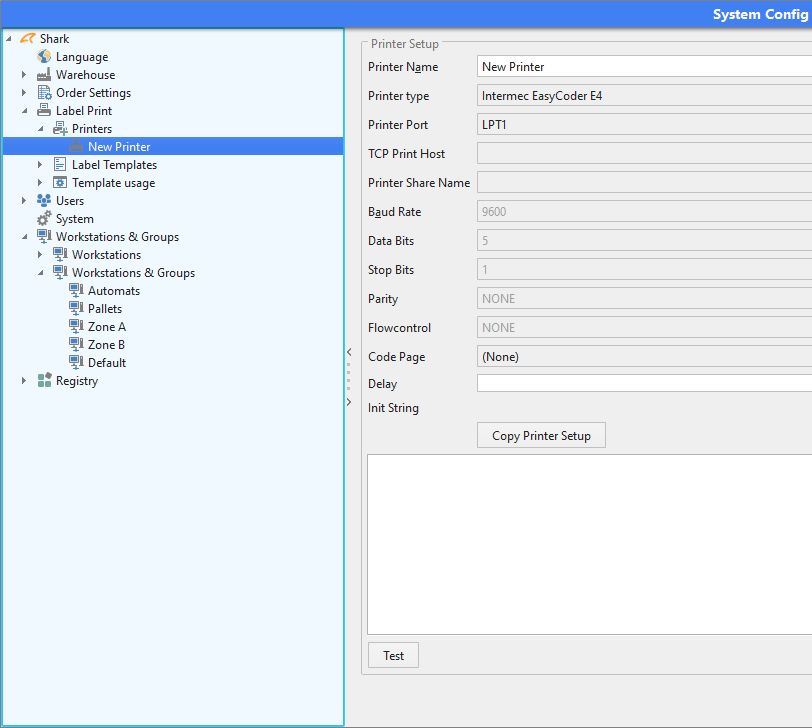
Step 3. Enter information on the printer-
Now enter the necessary information on the printer. It must have a name, and you must select which printer type is being used, and how it is linked to the PC from where the printing is done.
Step 4. Link template, printer and function together.
Then, we need to tell under what functions the printing should be done, with which template and to which printer and just as importantly, what needs to be printed.
Select, under ”Template Usage”, from which function the printing is done. Here is ”Batch pick” selected, which is the label printed from the Batch pick screen. Now please select the template and printer to be used.
Then you may select which type information that needs to be printed on the previously installed template.

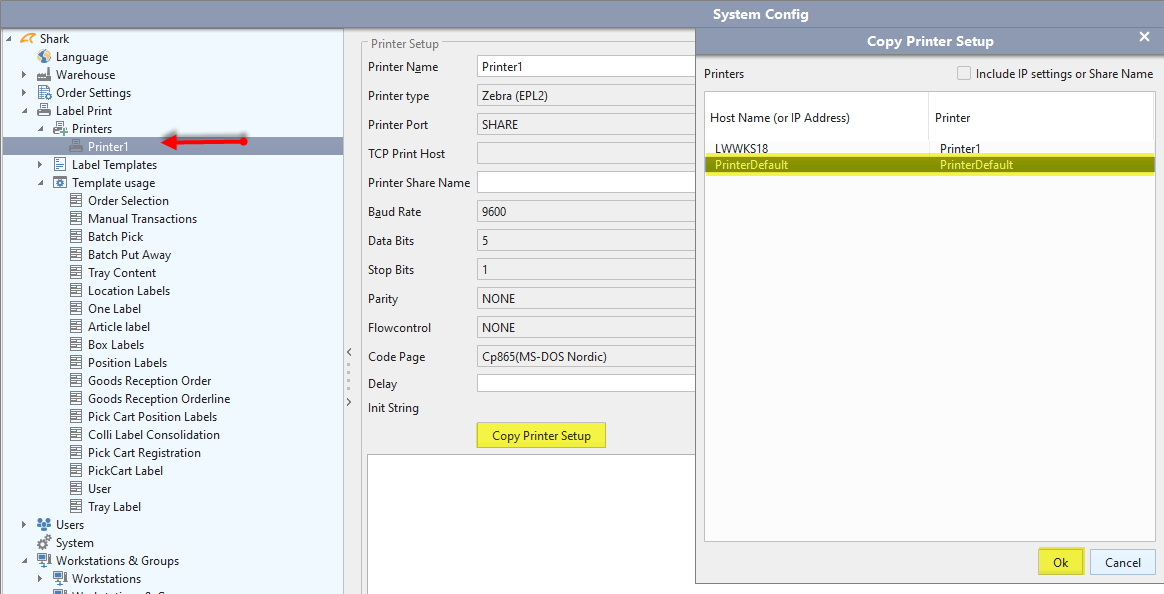
To activate a default template setup, copy “PrinterDefault” as shown below:
Connect to a host system
Normally Logisoft is connected and controlled by a host or ERP system. The host system will send orders and receive confirmation back. The default format is XML files. This is described in more detail in the technical documentation, please refer to Host Link Documentation.